Spark Science provides high quality science educational resources for secondary school teachers.
From dual-coding, literacy and reading tasks, dyslexic friendly backgrounds, and continual Assessment for Learning (AfL) tasks embedded into all our lessons, Spark lessons will increase engagement, participation and understanding for your students.
This is a KS3 Biology lesson covering the defintions of tissues and organs, examples of both in humans and plants, and the functions of some of the key organs.
This lesson may require students to have access to the internet.
This resource contains:
Teacher powerpoint including teacher guidance and answers
Student worksheet (PDF and Editable versions)
Student worksheet answers (PDF and Editable versions)
Lesson Objectives:
Define the terms “tissue” and “organ”
Identify some of the key organs in the human body
Identify some of the key organs in plants
Describe what some key organs do
This bundle contains all the content relevant to AQA Triple Chemistry students in the new 9-1 syllabus.
Includes 4 LESSONS worth of teaching materials:
This includes the standard tests and characteristic results/colour changes for:
positive metal ion flame tests (Li, Cu, K, Na, Ca),
positive metal ion precipitate tests with NaOH (Fe(III), Fe(II), Cu(II), Mg, Ca, Al)
sulfate test with barium nitrate/chloride
halide tests (Cl, Br and I) with silver nitrate
carbonate tests with dilute acid and lime water
These lessons contain full powerpoints, student worksheets, complete answers, risk assessments/technician order forms, stretch and challenge tasks, relevant exam questions, and AfL plenary activities
Lesson 1-2: Identifying positive metal ions (flame tests and precipitate tests)
Lesson objectives:
Carry out simple flame tests to identify positive metal ions
Carry out simple precipitate tests to identify positive metal ions
Describe how to carry out a flame test and a precipitate test, including the names of any important reactants
Describe the problems and limitations of using flame tests and precipitate tests to identify positive metal ions
Lesson 3 - Identifying negative non-metal ions
Lesson objectives:
Carry out simple precipitate tests to identify halide, sulfate and carbonate ions
Describe how to carry out precipitate tests to test for halide, sulfate and carbonate ions, including the names of any important reactants
Write balanced symbol and ionic equations for the reactions taking place in precipitation reactions
Lesson 4 - Instrumental Analysis and Flame Emission Spectra
Lesson objectives:
Know what instrumental techniques are
Describe advantages and disadvantages of instrumental techniques over other analysis techniques (e.g. flame tests)
Interpret flame emission spectra to identify unknown elements in a mixture
Lesson resources include:
Complete and full powerpoints - including starter activities, challenge activities, tables of results, practical instructions, questions with complete answers
Student worksheets and practical sheets with instructions and tables for results (PDF and editable word versions)
Student worksheet answers (PDF and editable word versions)
Practical risk assessments/order forms (up to date with CLEAPPS data as of Oct 2023)
Relevant practice exam questions with mark schemes and examiners reports.
This is a KS3 Biology lesson covering the physical changes that happen in our bodies when we breathe (limited to diaphragm, rib cage and lung volume) as well as using the bell jar demonstration of the effect of pressure on lung volume. This lesson also contains a practical to measure lung volume and manipulate the data of that practical.
This lesson contains:
Teacher powerpoint - including teacher guidance and answers
Student printable table (PDF and Word)
Lesson Objectives:
Describe the physical changes that occur when a person inhales and exhales
Describe a method used to estimate lung volume
WS: Measure lung volume
Correlate and analyse data from a practical experiment to draw conclusions
A comprehensive, engaging, challenging and interactive lesson package designed with non-science/non-physics specialist teachers in mind!
This lesson covers drag and friction, the different places we get both and where they are useful and not useful, as well as a simple student practical to measure the effects of different surfaces on friction.
This lesson contains:
Lesson powerpoint - including teacher notes, full answers, interactive activities, student practical with follow-up questions, and plenary
Lesson resources contain:
In-built challenge tasks throughout
In-built scaffolded learning for lower abilities and EAL (including dual-coding)
Practical investigation of the effects of different surfaces on friction
Careers links
Objectives:
Students will be able to…
Describe the effect of drag forces and friction
Explain how drag forces and friction arise
Describe how drag forces and friction can be reduced
Students will be working scientifically to:
Measure force using a newton meter
Record data in an appropriate table
use my observations to make a conclusion
This lesson covers the KS3 national curriculum on unicellular organisms, focusing primarily on euglena and amoeba.
This lesson looks at what unicellular organisms are as well as their parts and what each part does, and how they are similiar/different to animal/plant cells.
Lesson Objectives:
Know what a unicellular organism is
Name 2 examples of unicellular organisms
Describe the features of an amoeba
Describe the features of an euglena
This lesson resource includes:
Interactive lesson powerpoint with answers, teacher delivery guidance and plenary task
Student led reading task worksheet with questions (PDF and editable)
Reading task answer sheet (PDF and Editable)
A comprehensive, complete, engaging and challenging set of lessons and activities to teach students the basics of elements, compounds, mixtures and chemical formulas. This scheme/package is designed with non-science/non-chemistry specialist teachers in mind!
Lessons included in this bundle:
Elements and Compounds
Chemical Formulas
Counting atoms in a Formula
Pure Substances
Mixtures
Included in each lesson:
Lesson powerpoint - including teacher notes and answers in “notes” section
Student-led lesson worksheet
Teacher answer sheet
Lesson resources contain:
In-built stretch and challenge tasks throughout
In-built scaffolded learning for lower abilities
Various AFL activities to assess progress and understanding that you can tailor to fit any class or available resources (these include “think, pair, share”, molymod activities, mini-whiteboard quizzes)
Relevant risk assessments for any practical work (updated as of March 2023)
By the end of the topic, students will:
Know what an “element” and a “compound” is
Describe the difference between an element and a compound
Know what an “atom” and a “molecule” are
Describe the difference between an atom and a molecule
Draw/make particle diagrams and models to represent elements, compounds, single atoms and molecules
Understand why scientists use chemical symbols to represent elements
Identify simple elements from their chemical symbols
Identify elements in a chemical formula
Classify chemical formulas as elements or compounds
Count the number of atoms in a basic formula
Identify elements in a chemical formula
Count the number of atoms in formulas containing subscripts
Count the number of atoms in formulas containing multipliers
Describe what a pure substance is
Identify examples of pure substances in everyday life
Identify pure substances from particle diagrams and examples
Carry out a practical investigation to identify pure substances
Describe what a mixture is
Give examples of mixtures in everyday life
Identify mixtures from particle diagrams and examples
Draw/make models representing mixtures
A comprehensive, engaging, challenging and interactive lesson package designed with AEN students and non-science/non-chemistry specialist teachers in mind!
This lesson contains:
Lesson powerpoint - including teacher notes and answers in “notes” section
Student led lesson worksheet
Teacher answer sheet
Lesson resources contain:
In-built challenge tasks throughout
In-built scaffolded learning for lower abilities
Various activites to assess progress and understanding that you can tailor to fit any class or available resources
Objectives:
Students will be able to…
Identify reactants and products in a word equation
Write word equations for different reactions
Turn word equations into sentences
Describe and explain why we use word equations in chemistry
This lesson contains a student led lesson sheet, with the focus being on students learning through doing and practicing skills and identifying patterns and reasons themselves. Resources and slides ask students the key questions and develops ideas and concepts from the ground up and address common issues, mistakes and misconceptions.
This lesson contains AFL tasks which require mini-whiteboards, but can be adapted if these are not available.
A comprehensive, engaging, challenging and interactive lesson package designed with AEN students and non-science/non-chemistry specialist teachers in mind!
This lesson contains:
Lesson powerpoint - including teacher notes and answers in “notes” section
Student led lesson worksheet
Teacher answer sheet
Practical and Demonstration Risk Assessments
Lesson resources contain:
In-built challenge tasks throughout
In-built scaffolded learning for lower abilities
AFL activities to assess progress and understanding that you can tailor to fit any class or available resources
Objectives:
Students will be able to…
Predict whether a chemical reaction under given conditions will get lighter, heavier or stay the same mass
Explain why some chemical reactions might appear to get lighter
Explain why some chemical reactions might appear to get heavier
This lesson contains a student led lesson sheet, with the focus being on students learning through doing, practicing skills and identifying patterns and reasons themselves. Resources and slides ask students the key questions and develops ideas and concepts from the ground up and address common issues, mistakes and misconceptions.
This lesson is designed for AQA combined and triple chemistry.
This lesson builds on the previous lesson (Introduction to Electrolysis) where students looked at the basic set up for electrolysis and predicted which ion would be attracted to which electrode and why.
This lesson introduces the keywords anode, cathode, anion, cation, as well describing if ions gain or lose electrons at an electrode and are oxidised/reduced.
**Lesson Objectives: **
Identify anions and cations
Explain the movement of metal and non-metal ions to the anode and cathode
Describe and explain what happens to ions at the anode and cathode
Identify if an element is being oxidised or reduced at the electrode
This Lesson Contains:
Complete lesson powerpoint with teaching guidance in notes section, complete answers for all tasks, mini-whiteboard AFL assessment quizzes, animations to describe the movement of ions and the gain or loss of electrons in electrolysis
A printable cheat sheet for students explaining definitions and which ion is attracted to which electrode (editable and PDF)
A comprehensive, engaging, challenging and interactive lesson package designed with non-science/non-physics specialist teachers in mind!
This lesson teaches students the difference between weight and mass, and how to calculate weight using the “LESS” method.
This resource contains:
Lesson powerpoint - including, full answers, mini-whiteboard AFL, practice activities, full “I do, we do, you do” guided slides for calculations
Student practice worksheet (PDF and editable version)
Teacher answer sheet (PDF and editable version)
Lesson resources contain:
In-built challenge tasks throughout
In-built scaffolded learning for lower abilities
Various activites to assess progress and understanding that you can tailor to fit any class or available resources
Objectives:
Students will be able to…
Describe the difference between weight and mass
Calculate the weight of an object
Explain why weight is different on different planets
Students will work scientifically to:
Convert units
Calculate values using a calculator
Resources and slides ask students the key questions and develops ideas and concepts from the ground up and address common issues, mistakes and misconceptions.
This lesson contains AFL tasks which require mini-whiteboards, but can be adapted if these are not available.
This bundle is a complete topic pack containing all powerpoints, student worksheets, challenge tasks, plenary activities, and answer sheets for the KS3 Physics topic “Forces”. It also contains many specially selected student-led activities on the powerpoints (particularly designed to make teaching the concepts of forces, fields, resultant forces, and weight, easier, more fun and student-led).
There are also self-completing slides where answers can be clicked and move into the correct place (great for distance learning students and cover lessons).
This bundle contains the following lessons:
Forces
Drawing Force Diagrams
Hooke’s Law
Drag and Friction
Fields
Calculating Weight
Balanced and Unbalanced Forces
Lesson objectives/outcomes:
Lesson 1 – Forces
Students should be able to:
• Explain what forces are
• Compare different types of forces
• Describe how to measure forces and give the unit of force
Lesson 2 – Drawing Force Diagrams
Students should be able to:
• Describe how forces are represented
• Identify the direction a force acts on an object
• Draw and/or label force arrows on diagrams for simple example
Lesson 3 – Hooke’s Law
Students should be able to:
• Describe how forces deform objects
• Describe how solid surfaces provide a support force
• Investigate and use Hooke’s Law
• Take accurate measurements
• Plot a graph
• Draw a line of best fit on a graph
Lesson 4 – Drag and Friction
Students should be able to:
• Describe the effect of drag forces and friction
• Explain how drag forces and friction arise
• Describe how drag forces and friction can be reduced
• Measure force using a newton meter
• Record data in an appropriate table
• use my observations to make a conclusion
Lesson 5 – Fields
Students should be able to:
• Describe what a “field” is
• Describe the effects of fields
Lesson 6 – Calculating Weight
Students should be able to:
• Describe the difference between weight and mass
• Calculate the weight of an object
• Explain why weight is different on different planets
• Convert units
• Calculate values using a calculator
Lesson 7 – Balanced and Unbalanced Forces
Students should be able to:
• Describe the difference between balanced and unbalanced forces
• Explain why objects are in equilibrium
• Explain the changing motion of objects
• Calculate resultant forces in one dimension
This is the third lesson in the Year 8 “Working as a Scientist” topic. This lesson revises what discrete, catagoric and continuous data are, and practices getting students to select the correct graph (bar chart, line graph or pie chart) to use for different examples of data. Students will also practice drawing their own pie charts.
The lesson powerpoint is interactive and packed with quick and easy AFL tasks to help teachers assess the class understanding of content, and can be sped up or slowed down as necessary.
The lesson is complete and is a “click and teach” style lesson that will require little to no prep work for the teacher, so is ideal for those short on time and non-specialist teachers.
This lesson includes:
Teacher powerpoint with full answers built into slides, teacher delivery and hints in “notes” section, worked examples, AFL finger voting activites to assess understanding, answers to student worksheet
Student worksheet (PDF)
Lesson Objectives:
Select the appropriate graph to display data
Present data as a pie chart
For this lesson students will need:
Calculators
Pencils
Protractors
This lesson is taught with the assumption that students have met “types of data” before, but have never drawn pie charts or calculated angles of pie charts.
This is the fourth lesson in the Year 8 “Working as a Scientist 2” topic.
This lesson gets students to practice maniplulating data to find means, medians and modes.
This lesson contains AFL whiteboard tasks to assess student understanding in real time, a data collection activity and various opportunities for students to practice calculations.
This lesson resource contains all answers as well as challenge tasks. It is designed to be easy to follow and present, so is great for non-specialist teachers.
Lesson resources:
Lesson powerpoint containing teacher help/instructions in the “notes” section, AFL whiteboard activity, student data collection and manipulation activities, challenge tasks throughout
Lesson objectives:
Describe what a mean, median and mode are
Calculate Mean, Mode and Median for a set of data
For this lesson students will need:
Calculators
This lesson is lesson 6 in the Year 8 “Working as a Scientist 2” topic.
This lesson focuses on how we communicate science to different audiences, and how we can tailor our writing and presentation of information to suit them.
This lesson is designed to be a “click and teach” lesson with minimal planning needed from the teacher, which is great for non-specialist teachers.
Lesson resources contain:
Lesson powerpoint containing class activities and instructions, teacher delivery notes in “notes” section, discussion slides and full answers.
PDF copies of different types of scientific communication (A childrens science book, newspaper article and scientific journal article) all about melting ice caps.
PDF copy of a simple scientific journal article for students to adapt about the effects of temperature on seed germination (Students should have already looked at germination in Year 7)
NOTE: All example pieces of scientific writing are all tailor made for this lesson and are of the correct reading age for Year 8 students.
Lesson Outcomes:
Describe the key features of effective scientific communication
Describe how to adapt communication for different audiences
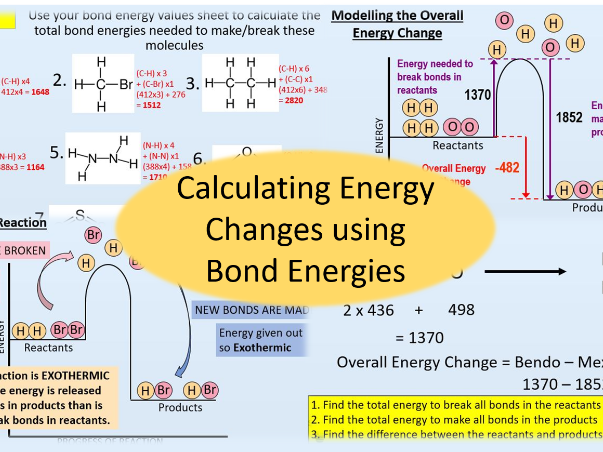
In this lesson students will learn what a bond energy is and how to use bond energies to calculate the overall energy change of a chemical reaction.
This lesson also links the overall energy calculations to the reaction profile diagrams students will have met in “Energy Changes 1”, allowing students to make visual links between their calculations and the profile diagram of the reaction taking place.
This lesson is the first lesson in the “Energy Changes 2” topic, and assumes that students have already learned about reaction profile diagrams and the basics of exothermic and endothermic reactions.
Lesson Objectives:
Describe what a bond energy is
Know whether breaking and making bonds are exothermic or endothermic
Calculate the overall energy changes for reactions using given bond energy values
Resource features:
Interactive powerpoint including teacher delivery notes and full answers throughout
Plenary task
Stretch and challenge tasks throughout
Clear diagrams, worked examples and scaffolding for calculations
Resource includes:
Lesson Powerpoint (pptx.)
Overall Energy Change Calculations: Student Worksheet (PDF)
Overall Energy Change Calculations: Answer Sheet (PDF)
Printable Bond Energy Values Tables for students (PDF)
This lesson is the first lesson in the “Space” topic and covers some of the main objects that can be found in the night sky as well as describing our place in the universe. The lesson contains various links to online videos, modelling software and simulations that really help students understand the vastness of space and allow them to explore the universe in which we live.
This Lesson Contains:
Lesson powerpoint, including activity delivery instructions for teachers, full answers, plenary task, AFL whiteboard task and discussion activities
Lesson Objectives:
Describe the objects that you can see in the night sky
Describe the structure of the universe
A comprehensive, engaging and interactive lesson package designed with non-science/non-chemistry specialist teachers in mind!
This lesson contains:
Lesson powerpoint - including teacher notes and answers in “notes” section
Student led lesson worksheet
Teacher answer sheet
Elements, Compounds and Mixtures printable decision tree
Lesson resources contain:
In-built challenge tasks throughout
In-built scaffolded learning for lower abilities
Various activites to assess progress and understanding that you can tailor to fit any class or available resources
Objectives:
Students will be able to…
Describe what a mixture is
Give examples of mixtures in every day life
Identify mixtures from particle diagrams and examples
This lesson contains a student led lesson sheet, with the focus being on students learning through doing, practicing skills and identifying patterns and reasons themselves. Resources and slides ask students the key questions and develops ideas and concepts from the ground up and address common issues, mistakes and misconceptions.
This lesson contains AFL tasks which require mini-whiteboards and molymods, but can be adapted if these are not available.
A short, engaging lesson (ideal to complete before a mid-topic summary) designed with non-science/non-physics specialist teachers in mind!
This lesson teaches students about what a field is and how forces are felt within fields for different non-contact forces (especially gravitational fields and magnetic fields).
This resource contains:
Lesson powerpoint - including full answers, mini-practical with instructions for students
Lesson resources contain:
In-built challenge tasks throughout
A mini “discovery” style practical
Objectives:
Students will be able to…
Describe what a “field” is
Describe the effects of fields
Resources and slides ask students the key questions and develops ideas and concepts from the ground up and address common issues, mistakes and misconceptions.
An interactive powerpoint resource designed to be used for distance learning from home.
Also contains interactive questions, a cheat sheet of common ions and practice questions.
Students should be able to:
Predicting the formula of salts from their names and ions
A simple but effective wall display of some of the most common chemical formulas used in chemistry (especially relevant for the KS3 and GCSE Chemistry syllabus).