I am a Primary Science teacher in Perth Australia. I enjoy developing resources for my students that encourage hands on inquiry and investigation. I would like to see my students develop a life long passion for Science and to become active advocates at conserving and protecting the Earth's precious resources.
I am a Primary Science teacher in Perth Australia. I enjoy developing resources for my students that encourage hands on inquiry and investigation. I would like to see my students develop a life long passion for Science and to become active advocates at conserving and protecting the Earth's precious resources.
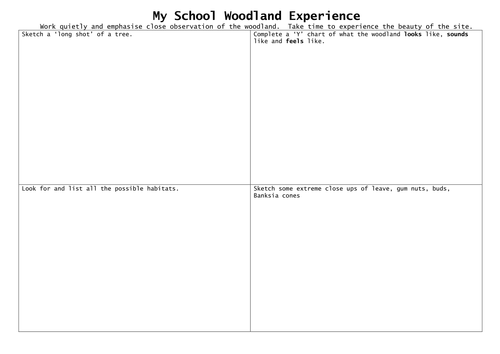
Students were taken to the school woodland and encouraged to take time to reflect and enjoy the woodland environment. Students completed four different tasks - a Y chart to draw on their senses, sketches of trees, leaves, bark etc and a search for habitats.
This worksheet activity guides the students through three weathering and erosion investigation activities. In the first activity this students are given a half cup of frozen water. The teacher will need to set this up the day before. Each team or pair of students will require a cup of frozen water. They will compare and make observations about a glacier freezing and melting. In the second investigation each team of pair of students is given a small container containing three sugar cubes. By shaking the container the students simulate wind. Particles of sugar will gather in the container. This is the wind weathering rocks. In the third investigation the students are given a small piece of chalk and a container with vinegar and a pipette. The slowly add drop of vinegar to the chalk and observe the changes. This is ‘acid rain’. There are a few photos on the second page and the students identify what type of weathering is happening in each one.
The students were given the following materials to complete this investigation
a ruler
a large foldback clip with the steel pin removed - this is the fulcrum
several objects -small blocks, erasers, sharpeners etc easily sourced around the classroom. Plus a few heavier objects for investigation 3.
Investigation 1 - First class lever
The students set up their equipment to balance two objects
Investigation 2 - Second class lever
The students set up their equipment with the fulcrum at one end of the ruler and then balance two objects.
Investigation 3 - Third class lever
The students set up their equipment to lift a load.
In their Science Journal the students choose two of the investigation and draw a diagram including these labels - fulcrum, object and ruler.
For this investigation each team of students will need
a small container of sea shells.
a piece of coloured card A3 size.
textas
There are three slides in this resource
Title slide
Suitable to for Years 1-3 students. The students complete several sorting and classifying activities. They arrange their shells onto their A3 coloured card then use the words on the powerpoint to label their collection.
Slide suitable for Years 4-6. For this activity the students have a few more challenging tasks.
To conclude this activity the students can take a photo of their display with their iPads and upload to their digital online learning platform - eg Seesaw, Google Classroom, Freshgrade.
Bread mould investigation powerpoint
This is a powerpoint to guide your students at setting up a bread mould investigation.
It includes the following slides
what do you know about mould and what things effect mould growth
procedure for setting up the investigation
prediction
variables
developing the investigation question
presenting results and reviewing the investigation.
Bread Mould investigation worksheet - this can be found as a free resource on my shop
Students were placed into teams of three and given a slice of bread to place into a zip lock bag. We then discussed the different locations around the school where they could leave their investigation for a week to encourage bread mould to grow. Do you think bread mould would prefer warm, cold, moist or dry environments? During the week the students were encouraged to make daily observations. At the conclusion of the activity the students completed the remainder of the worksheet.
Bread mould rubric
This is a rubric to accompany my ‘free’ resource called ‘Bread Mould Investigation’.
Some of the assessable outcomes include
Student predicts the conditons and location that are best for mould growth.
Student observes mould on bread samples with magnifier.
Student attempts to draw a labelled diagram of mould growth.
Student uses word wall to assist when spelling difficult or new words.
Student evaluates findings and completes questions.
Student works cooperatively in a team and performs team role.
This resource is a powerpoint to teach students about fish adaptations and how fish survive in their habitat. Teachers could use this tool in several ways
As a factual text with each student choosing one species and conducting their further research about the adaptations of their chosen fish.
Drawing a detailed picture of the fish with annotations to explain the adaptations.
Teachers could get their students to draw a table in their Science Journals and use the information in the slides to classify different features for each fish eg how is the body covered, how does it move, where is it found (in rock pools or deep ocean), how it finds it’s food etc
Students were placed into teams of three and given a slice of bread to place into a zip lock bag. We then discussed the different locations around the school where they could leave their investigation for a week to investigate if bread mould would grow.
Investigation question
Do you think bread mould would prefer warm, cold, moist or dry environments?
During the week the students were encouraged to make daily observations. At the conclusion of the activity the students completed the remainder of the worksheet.
BTW - in Australia we spell mould with a ‘u’. The document is in Microsoft Word so you can change the spelling to ‘mold’.
After viewing the Squawks in the Night powerpoint the students were given this worksheet. The task was to sort out the nocturnal and diurnal animals and then draw an animal of their own- preferably an Austrlaian animal.
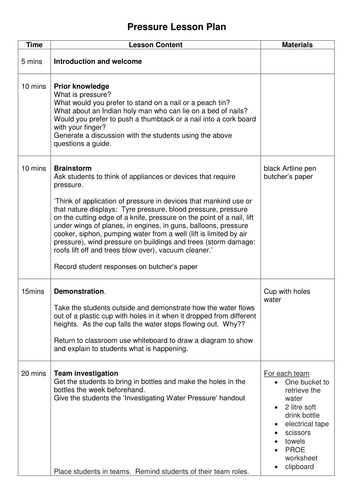
This is a lesson plan, powerpoint and an accompanying worksheet about water pressure. The first investigation is with the teacher demonstrating how water stops flowing out of a plastic cup that has holes in it when it is dropped from a height. In the second investigation the students conduct their own trial by allowing water to be released from a hole in the bottle one at a time and measuring how far the water comes out at. There is also a challenge activity for the students to discuss on youtube.
1. Ask students to define stormwater. Record their ideas in the Class Science journal or on the whiteboard.
2. Show students a video clip explaining what is stormwater.
Discuss the need to keep our waterways free from pollution.
3. Take students on a tour around the school to identify drains, gutter, downpipes and grates etc.
4. Use the powerpoint to guide students through their written responses.
This is an activity investigating friction using remote control cars. For this lesson I purchased three different remote control vehicles from K Mart - a four wheel drive, a sports car and a jeep/buggy. Use the powerpoint to guide the students through the learning activities which include writing a prediction, conducting a fair test and recording their findings. The powerpoint also includes a procedure explaining how to set up the investigation on your school grounds. Accompanying the powerpoint is a worksheet for these students to record details of their investigation and to record their findings and data on a table.
The students make their own Scribblebots in teams of three.
Once the students have completed their Scribblebot’s conduct a brainstorm with the students and record their ideas on how they could test out their Scribblebot’s performance. Give each team very large piece of paper. Use the worksheet to plan the investigation and record data. At the conclusion of the activity each team presents their findings to the class and gives a demonstration on how they conducted their challenge.
Students will learn that everyday tasks that seem easy to us are difficult for a mechanical robot to perform. Students will investigate this by using a robotic toy hand. As a class we will discuss the limitations and challenges that robots face in grasping tools and manipulating them. To conduct this lesson you will need to purchase up to 12 or 14 robotic toy hands. This can be purchased at Toys R Us for about $7(Australian dollars) each. There are plenty of youtube clips that you can show the students prior to the investigation that cover the use of robotic arms in industry and on the ISS. Once you have your equipment then you can use the powerpoint to guide the students through two investigations. Part 2 and Part 3 of this package is the worksheet to accompany the investigations.
This powerpoint guide prepares students for a design task. Discuss with students what they have read or observed about robots helping to improve the quality of life of people with disabilities, or for use in medicine or in hospitals. The task is to design a robot that can help someone. Students label each of the robot’s parts or features and then write a paragraph on how their design could have a positive impact on the quality of a human’s life.
Students include a comment predicting whether humans will accept or reject the new robot and why.
The students were placed in teams to view Robots in Industry from this website (cut and paste this address) . This website has been crated and designed by Crickcrick which is me an author and seller on TES
http://thescienceworkshop.weebly.com/year-6-robots-in-industry.html
Each team viewed a set of youtube clips about a type of robot or drone. Some examples are - car manufacturing, drones, marine robots, surgical robots, autonomous vehicles, NASA robots and robots for manufacturing. After viewing the video clips students work in their teams to discuss the questions on the worksheet about the role and task of robots and the positives and negatives of robots in our society and for the future.
This is a 15 slide powerpoint that takes students step by step through an investigation into lava viscosity. Students will work in teams to mix different viscosities of flour and water then pour their mixture onto a paper plate to investigate flow. This investigation leads into a discussion on how different volcanoes take their shape dependent on lava flow. The powerpoint concludes with a focus on the possibility of past volcanic activity in Australia.
This erosion investigation can be carried out in the school sand pit to investigate the effects of water on sand. Students can investigate what happens to a sandcastle when they pour differing amounts of water onto it.
The powerpoint details the steps required for students to conduct their investigation. Students use the 'investigation planner' to determine variables and record their measurements and findings.
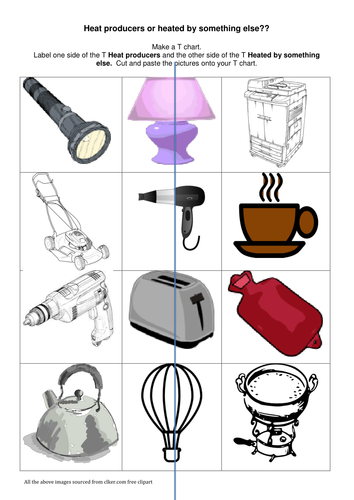
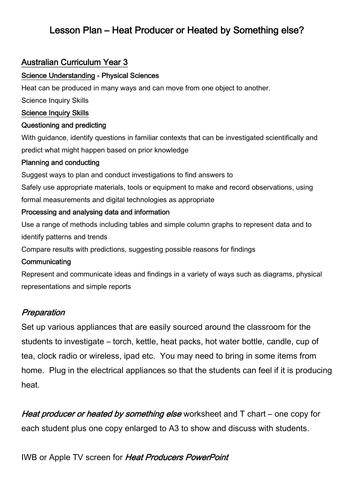
Heat producers or heated by something else??
This lesson package includes
1. A powerpoint presentation to identify and discuss with students when an object producers it's own heat or is heated by something else.
2. A hands on team investigation to identify various heat sources set up around the classroom using objects sourced in the classroom or brought in by the students or class teacher.
3. This task is the assessment component. Students need to identify images that produce their own heat and images that are heated by something else and sort them onto their T chart.
4. An assessment rubric to accompany the worksheet component.
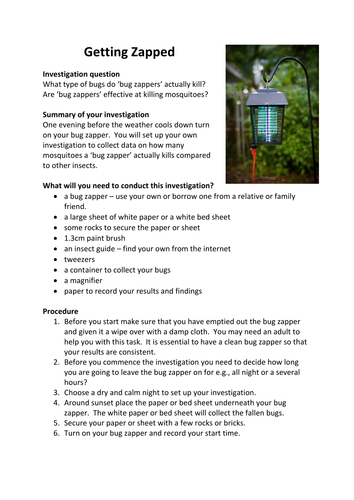
Students set up a bug zapper in the evening at their own home to conduct their own 'fair test'. All the information you need is explained on the word document - investigation question, materials, procedure, analysing and explaining the results and extension ideas.
Heat producers or heated by something else??
This lesson package includes
1. A powerpoint presentation to identify and discuss with students when an object producers it's own heat or is heated by something else.
2. A hands on team investigation to identify various heat sources set up around the classroom using objects sourced in the classroom or brought in by the students or class teacher.
3. This task is the assessment component. Students need to identify images that produce their own heat and images that are heated by something else and sort them onto their T chart.
4. An assessment rubric to accompany the worksheet component.