Teaching Art is a feast into a of colour, line, texture, space and shape. By encouraging a visual exploration in my learning I love developing a creative approach to learning in the classroom. By encouraging different techniques and an understanding of art I hope to help students appreciate visual learning more. I hope you enjoy my uploads and can use them. Please contact me if you require any further information.
Teaching Art is a feast into a of colour, line, texture, space and shape. By encouraging a visual exploration in my learning I love developing a creative approach to learning in the classroom. By encouraging different techniques and an understanding of art I hope to help students appreciate visual learning more. I hope you enjoy my uploads and can use them. Please contact me if you require any further information.
Success Criteria-
Develop a range of textural paint techniques
Experiment with blending colours
Experiment by layering and combining different techniques
Create a water colour exploration page to show variety of techniques.
Make a page of experiments following the list below.
Try to explore each technique.
When complete cut these into square shapes and display this neatly in your sketchbook.
Heading: Watercolour experiments
A Graded wash warm colour to cold colour
B. SGRAFITTO-scratch paper wash over with watercolour
C. DRIPPING TECHNIQUE
D. WET IN WET- drop another colour of waterscolour into a wet wash
E. GRADED WASH light to dark
F. CLING FILM-put over wet wash and let dry
G TRANSPARENT washes of colour overlapping each other
H. OPAQUE to transparent
I. USING BLOCK OUT TO CREATE WHITE shapes
J. FLAT WASH
K LAYERING OF PAINT details
L. SPLATTER TECHNIQUE
M. Wet paint and drop salt
N. Use a dry brus over colour
O. Use masking tape to block out areas
P Stippling with watercolour
The powerpoint gives an example for each technique
There is also an exercise to match the correct picture with technique and an answer page.
A detailed project looking at developing a Still-life project looking at composition, rule of thirds, different techniques for each object with different art styles.
Students firstly, study what is a Still-life and write up a definition for this.
Students then look at what different styles in Art before Modern Art.
Students look in detail at Dutch Still life and the Vanitas still-life.
There is also some information on the Post Impressionist artist Paul Cezanne and his style of brushwork.
A focus on what is still life?, then looking at Pop Art and what is pop Art? Students then answer questions on two Pop Artists: Michael Craig Martin and Patrick Caulfield. Students practise making a background on Pop Art in their sketchbook and answer the questions.
Students develop their own Still-life and are told to bring in objects for their Surreal mixed media Still-life and their are examples of this. Students learn to compose a layout for their still-life final using a Viewfinder and the rules of third, Fibonnacci rule to help them construct a composition. Students develop their own Still-life and are told to bring in objects for their final arrangement.
The emphasis is then to take them through different techniques with each object they brought to class. The techniques included in the project are: Wax and Scratch, Paper collage, Pop Art hard edge colours and outlines, Palette knife painting, Pencil shading and Pen drawing.
There are finally student examples of final outcomes for this project to support the outcome.
The project has examples of plant forms to look at and by using Ernst Haeckel and Nikki de St Phalle. The students begin to research their own design plant shape on a presentation sheet. This involves drawing with fine pens over a wash of colour.Examples are given in Powerpoint - lots of pictures of plants and examples of how to do a wash.
Students can also do some Wax and scratch drawings of natural forms using wax crayons and oil pastels. Students then present these on a preparatory sheet- there are examples of this technique.
Secondly students then using their own drawings (wax and scratch) of plants and Niki de St Phalle and Haeckel begin to do a design sheet for their monster plant.
Resources needed: Plastic pot plants to stand the branches and plants in, withies, newspaper, tissue paper, masking tape, PVA glue to make paper mache glue, re-cycled card, re-cycled bottles, acrylic paints to decorate.
The students study they work of Niki De St. Phalle looking at her biomorphic and colourful sculptures and then by using the her work as inspiration plan a design and build a 3D form using withies, found re-cycled plastic bottles and cardboard and construct a plant form in a large plastic plant pot as a basis. There are examples of outcomes and examples of skills to use in the buildong of construction,
The powerpoint has lots of examples to use as inspiration and final examples of outcome.
A comprehensive drawing powerpoint with different tasks on developing drawing skills, discussions, mark-making exercises, different techniques, methods and examples to support observation skills in the classroom.
To use with GCSE and A-level students to develop their skills in looking at drawings and discussing their techniques but also doing a variety of different tasks to develop their own recording skills.
Learning to work with continuous lines, blind drawing, structural drawings, shading techniques, gestural drawing and free mark-making.
The powerpoint has examples of drawings of a number of artists like, Paul Seurat, Frank Auerbach, Rembrandt and Van Gogh and gives a number of opportunities to learn from these artists and gives different methods to use to strengthen one’s drawing skills.
A detailed Celtic medieval project looking at examples of how to draw in a simplified stylised way and to represent one’s own family, friends, animals in an illuminated letter.
Students make up two large letters in pencil crayons learning to draw stylising their own pictures and study a number of medieval examples of letters and learn to elongate and to distort their own pictures capturing a simple picture with expression.
Students draw this on white paper their two initials and add in all the medieval patterns. There are loads of examples on this powerpoint of various medieval letters and illuminated manuscripts to copy from to give the students enough resources to work from .
There are also tasks and steps to follow for teachers. An enjoyable project that also should include how to shade carefully using light and dark tones with pencil crayons as part of unit of work and how to draw using warm and cold colours.
The work is finally presented cut out and pasted onto black paper and students can then use oil pastels and further decorate their presentation to create the intricate pattern work of an illuminated manuscript letter.
There are plenty of examples of Andy Goldsworthy on the slides and examples of other peoples work doing land art.
Students will also need to identify various examples of materials used in Goldsworthy’s work.
Students will also need to complete an analysis of one example of one of Goldsworthy’s work: Penpont in Cairn. There are questions to answer on this work.
Also there is a project task for students to make their own land art outcome and examples to be inspired from.
The powerpoint first of all gives you some techniques to use with paper and students to make a sample board of the techniques.
Homework task: Zentangle …see powerpoint example
Students then go on to draw out an insect and there are symmetry templates for you to use to develop insects.
There are also lots of different resources and pictures of insects to use.
Further task is then to build the paper craft techniques on the pen drawing and to make your relief paper insect. There are examples of different paper techniques and samples to develop.
**Learning Objectives **
Using the topic given insects/birds the aim is to develop their paper art skills and to begin to make an insect. Also, to use skill of symmetry and practise drawing skills and to build a 2D relief insect using paper creatively.
• To learn how to do various paper art techniques and develop ability to manipulate paper.
• To explore a number of different paper craft activities, there are slide examples of techniques.
coiling paper
folding paper
spiraling paper
layering paper
scoring paper
embossing paper
twisting paper
rolling paper
curling paper.
• To EXPLAIN HOW TO carefully draw out insects using the symmetry insects as a guideline.
• To cut out the shapes of insect drawing carefully
• To explore paper techniques.
**Resources **
Large square of re-cycled paper to paste the paper sample techniques on
Glue – pritt stick and pots of glue
Pencils, Scissors
Magazine paper to use to make insects, Pens to draw with
Tracing paper to help with symmetry drawing
**ACTIVITY OBJECTIVES **
To make a sample board of different effects one can achieve when using paper as an art form.
To develop a range of skills to use when working with paper artists and craftsman
To learn to coil, scratch, spiral, fold, bend, cut and lift, twist, emboss, layer, cut, roll and manipulate paper
To learn about different paper artists and craftsmen who work with paper as an art form.
To learn to use paper and to craft various shapes and folds
To learn to build a paper insect using the paper craft techniques, that is, to fold, score, layer, cut, emboss and coil a paper insect
To do homework task: Zentangle insect.
Examples of artists on the Powerpoint to help you to build a 3D paper sculpture with techniques
Also various templates to help you to draw an insect - especially to develop your ability to use symmetry.
A Still-life project basic one page 5 min scheme with Dirt and Weekly plan.
See the Still-life project on TES.
This is an overview of acstill-life project which entails drawing in different media a still-life composition. Below are a list of all the lessons.
ART THEMES before modern art. What? Modern Art? and Still-life?
Composition? Rule of thirds. Organising still life. Paper prepare: Black/brown paper: newspaper/music, Draw Still-life in line.
3 Exploring pencil mark-making techniques. Pencil tonal study of geometric shapes
4 Pop Art discussions – To make a 2D coloured flat shape area of composition
5 Explore with Oil pastel: Using oil pastel detail
6 and 7 Exploring pen mark-making techniques. To draw over a Cubism Collage using a biro pen
8 Exploring Charcoal techniques Drawing on black paper using white chalk/charcoal.
Research Artist study on Robert Raushenberg library
10 – Evaluation of still-life drawing project
11, 12 and 13 Mod roc Relief
14. Evaluation
This powerpoint is about drawing in charcoal and white chalk on black paper. Students collage a black piece of paper on their paper and then draw a part of their still-life using this technique.
The overall Learning Objectives are:
To develop my understanding of Art and pre-modern art and the meaning of a Still-life drawing.
To develop my observational drawing skills.
To create a Still-life drawing learning to draw carefully from observation with a viewfinder
To learn how to compose a composition using the rule of thirds and developing an understanding of the Golden Mean AND COMPOSITION PRINCIPLES
To develop a further understanding of Pop Art and do a flat colour paper shape detail in your drawing.
To develop my knowledge of the elements of art: lines, shape and form
To develop techniques in different media in my drawing and to explore markmaking of pen, pencil, oil pastel and charcoal.
To practise my observational drawing skills in the following techniques: oil pastel, drawing with a bro pen, using chalk and charcoal
To develop my knowledge of Robert Raushenberg (Pop Art) and practise drawing over a light printed surface with pencil.
To explore developing a relief surface of an area of my still -life drawing and develop this in mod roc technique
To develop an understanding of the work of Joan Miro by looking at the example ‘The Harlequin Carnival’ and describing what you see.
To draw out a cupcake consolidating what you learnt in class in pencil.
To make a magical creature out of a splash of coffee.
To trace this and to colour this in as best you can.
To then paste your magical creature on the cupcake drawing and to creatively colour this in.
To evaluate your outcome.
To take a photograph of your sheet of A4 paper and to upload this to the Shared drive X.
Task 1
Write for a Heading ‘Surrealism’ on A4 paper Look at the picture by Joan Miro on the right called: ‘ The Harlequin’s Carnival’. This is a typical Surrealist picture.
Describe this work on the paper, describe what you see in one sentence. Write 2 or 3 lines on your paper about this painting using descriptive words.
Task 2
On the piece of A4 paper carefully draw a cup cake. Size about the normal size of a cake place this at the bottom of the A4 paper
Follow the steps on this slide to help you to draw one cupcake.
Draw this lightly with pencil like the examples given on the right.
Task 3
Make a very little coffee, some black coffee in a cup. Wait for this to cool before using this. (You can make the coffee by putting half a cup of water and mix a spoon of coffee with this.)
Splash strong cold coffee on another piece of paper – ( not the drawing paper of cupcake)
When the coffee splash is dry draw in and around this splash in pencil and make a fantasy random magical creature like the examples on this slide and the next three slides
Task 4
Once you have your coffee splash and have drawn around this.
Try to copy this out again, that is, put a piece of white paper over the splash you can use your window light to help you trace it
Colour the tracing in.
Task 5
Cut this out. You have now made a magical creature!
You could outline this darkly with your pencil.
This is the style of Joan Miro –who uses flat shapes. You now need to colour in with flat colour shapes (that is, no shading!) . See examples. You can use pencil crayons and felt tips if you have. If you do not have this just use your pencil to colour this in.
Paste this on your cupcake
Decorate your cupcake creatively with magical creatures.
Task 6
Creatively finish colouring in your cupcake as best you can. You can collage – stick coloured papers and decorate.
Paste this on your A4 sheet with task 1.
Complete a short evaluation. Write next to your cupcake artwork. Telling me what went well and about any issues you had.
Take a photo of your A4 page work.
Save this giving the jpg. your name
Upload this to the Remote Learning Work load.
You will find your class with your name.
Upload this to your name please
This is a powerpoint which gives tasks to interpret the style of Hundertwasser.
There are worksheets and information on the artist.
This is part of a project where students design a tile shape in colour using a building phito as an inspiration and stylise this into their own design.
Students then turn this into a clay tile outcome.
This is a very successful drawing lesson to build confidence with drawing. It can be used at any level as skills are on invaluable. It can be stretched over two lessons.
I have a shoe box of little ornaments wrapped in fabric and tied up with tape that I use for this lesson and over the years this is one of my favourite lessons.
I finally tried to make a powerpoint and hope you enjoy !
There is a drawing starter exercise
Then the fun begins
Objectives
To explore observational drawing techniques: blind drawing and contour drawing
To investigate how to capture techniques (markmaking) when drawing
To build confidence in capturing a form with line by using different styles when drawing: gestural drawing and pattern drawing
To develop a design from observational details
There are 17 drawings to make … and each slide gives you the instruction and an example of drawing
Resources
A3 cartridge
sharp 2B pencil
small objects to draw wrapped to start
oil pastel each
Fine-liner each
ruler
pencil rayons
small bit of tracing paper cut in squares ( size of unit for repeat)
starting with the following
. TOUCH DRAWING
Draw through TOUCH ONLY
Feel the object under a cloth draw the object – and try to imagine the shape, texture, and form
Try to draw and outline only.
2 minutes
BLIND DRAWING
Draw with CONTINUOUS LINE and BLINDLY 3 min
Draw the object and draw blindly. DO NOT LOOK AT YOUR PAPER as you draw.
Instead imagine your pencil as a contour ( an ant crawling on the object) exploring all the edges, outlines, shapes, textures and details of the object.
2 minutes…
Follow the slides
There are pictures of student examples.
Success criteria
The line and markmaking quality is MORE important than accuracy
This gives students a realisation that drawing is about lines and marks.
A summary of objectives and the requirements for students to continue to do homework based on these. A few lists of homework ideas and a summary of what is required.
Students given examplesof nature pictures and to create a repeat pattern from a pencil drawing of these pictures Pictures of nature for students to draw from and then how to make a repeat unit from this drawing
Showing how to make a mirror repeat, half-drop repeat, straight repeat and diagonal repeat.
Resources needed: Tracing paper, pencils, calico fabric cut in squares, ink rollers, waterproof inks,
Step by step breakdown of design and printing processes
Guidelines on how to use polyprint. Students make a repeat pattern on fabric and then sew this into a cushion
There are lots of student examples to support
Examples of student work
Success Criteria
Simplifying drawing into a line pattern and making a repeat unit,
Choosing a colour combination for repeat unit and drawing out the unit on fabric
Carefully rolling out the colours and layering the print from light to dark.
Strong contrasts of colour
Careful accurate layering of colours.
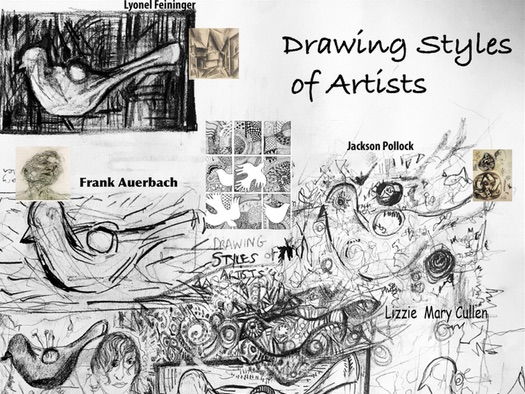
Students are to develop creative drawing by analyzing and interpreting a variety of selected artists.
Students will produce a drawing showing contextual evidence that supports the assessment criteria for the A Level course.
This powerpoint gives the LESSON PLAN AT TH END OF THE PRESENTATION.
Students to reflect on examples of copies of drawings of different MASTERS and illustrators and begin to analyse the types of shapes, lines and marks.
Develop an understanding of signature styles of particular artists and the way the artist’s signature captures the intrinsic meaning of the artist.
Students to develop an A2 sheet of drawings which shows the different mark making skills of a number of different artists; develop a still-life drawing which support a number of different artists marks.
You must show evidence of research and of investigating and developing ideas. This should include visual work and, if appropriate, annotations or written work. Practical responses to the work of other artists, designers, craftspeople and photographers must show development in a personal way.
ASSESSMENT OBJECTIVE:
develop ideas through sustained and focused investigations informed by contextual and other sources, demonstrating analytical and critical understanding
Analysis Activity- follow Mark-making analysis of artists
Put students into PAIRS give out an example of each of these artists drawing – photocopy to pair
CULLEN AND AUERBACH,
VAN GOGH AND POLLOCK
FEININGER AND GILMAN
NICOLSON AND MICHELANGELO
Students to describe the marks, the quality of the lines and shapes that define the artist.
Analysis Activity Feedback– Choose one of the works and will one of you in the group discuss this with the class. Other students may also add comments.
TASK ACTIVITY Creative Practical Skills independently
Students to choose 2 of the artists discussed or analysed in the groups and try to do a drawing now in the style of those two artists.
With a ‘window frame’ students to draw in the style of the artist in a small frame on their sheet.
Prompts Questions to Evaluate Drawing outcome
What does it remind you of?
What does the work represent?
Have any parts been exaggerated or distorted?
What message does the work communicate?
What kind of marks does the artist use?
What kind of shapes can you find?
What materials and tools have been used?
How does the work make you feel? Does the line, shape, colour affect your mood?
What do you like about it Why? What don’t you like? Why?
How might you take ideas to use in your own work?
What do you know about the artist?
Does the work relate to the social or political history of the time?
These are a set of 6 sheets which can be laminated for classroom tables to help students with writing about Art.
These are lists of descriptive words linked to the Elements of art and the Principles of design. These will help students to be able to write about artworks and help to broaden vocabulary.
There are also words to help with writing at GCSE and support with writing under the GCSE Assessment Objectives as well.
There are also sheets to help with writing frames to support weaker students when they analyse and write about their artworks.
This can be used with Key Stage 3, GCSE and A-level
Leaving these on the desks in the classroom support literacy learning and help students with vocabulary.
A project for KS3 possible Year 8 looking at Surrealism and the ‘psycho-automatism’ of the artists.
Students develop a FANTASY LANDSCAPE for their own paintings out of ink blobs dropped onto their paper and out of random scribbles.
Students learn to use these abstract shapes creatively in a composition and are able to thus learn how to shade with paint from light to dark to create a 3D effect of form. The emphasis is on getting students to understand what is chiaro=scuro through the light and dark modelling of abstract shapes. The abstract shapes help them understand that there is no wrong and helps them focus on getting the 3D modelling right.
The students need to make a wash for a background with watercolour - using perhaps a sponge. The emphasis is on creating a sense of space with a horizon line and students have to compose their blob/scribble shapes in this infinite space to create a sense of depth on a flat surface. Students need to repeat the shapes and arrange them in different sizes. Students also need to create a sense of interest in the painting.
Their surreal shapes are repeated and they are able to change the scale of their forms to develop their fantasy landscape.
The second task is to do a black and white pen drawing of their painting, this develops mark-making skills and patterning. This is also a technical exercise where students have to then transform their painting into a black and white pen rendering.
This powerpoint has examples of student’s work which helps to support the development of these activities.
A Key stage 3 project which starts with Figure drawing of class mates - lots of student examples to support and instructions for drawing.
Students then look at modern sculptures and uses them to simplify their figures into abstract shapes. There are once more student examples and clear instructions showing how to simplify. It is important to get students to show the simplification of their figure drawing into an abstract shape.
Students study 4 different sculptural artists - Further task involves doing an artist study on one of the Sculptors: Henri Moore, Anthony Gormley, Barbara Hepworth and Jean Arp and then students make a moodboard of their work. There are sheets for each sculptor showing some info and pictures of each sculptor.
Then there is the making of the sclpture with video clip to explain how to build armature and how to make 3D form using paper mache - there are a lot of good examples of student figures
Students then need to build the figure out of cardboard, papier-mâché, wire, straws and recycled objects and to decorate this with coloured paper, tissue paper and any other embellishments like buttons, beads and string.
Furthermore there is the embellishment of the sculptures…development of design and pattern by looking at Aboriginal Art, Gustav Klimt, African Art, Beatris Milhaze and students have to choose one of these designs to inspire their figure and begin to decorate their figure.
The students then draw out the simplified figure shape with the abstract colourful patterns and present this on a page in their sketchbook.
Finally there is the development of this figure into a hanging mobile looking at the work of Alexander Calder and an evaluation.
This is a key stage 3 project where students do a polyprint on fabric using printing inks. This is a short 6 week project but could be developed to incorporate embellishments and sewing skills to fabric. I did this with year 8 and it took 6 weeks. Student enjoyed the outcome and it could have been made into a cushion for each student but we made a class fabric wall hanging. (There is a second Powerpoint in a Bundle which has all the pictures used for students to work from - A-Z of nature pictures)
Artists used: Angie Mitchell and Ernst Haeckel
Resources required
Polyprint blocks
Printing ink
Rollers
Tables to roll out on
Fabric square per child
Paper for test prints
Research sheet for drawings and artist research.
Project schedule 6 weeks
The resources for the students to work from. Each student chooses what they would like to draw.
The steps to take while making the print and examples of student’s outcome.
Students begin by researching Angie Mitchell and Ernst Haeckel and make up a sheet with these two artists and their drawings. The drawings they do of one of the pictures of the slide pictures of animals and bits of nature from A-Z. Students choose which animal or fish or plant they would like to draw. Students spend time doing a detailed drawing and design a border pattern for this work in black and white.
Success criteria of drawings
To use fine lines and to capture quality detail
To concentrate on negative and positive shapes
To develop a border pattern from nature around the drawing
To try to layer up your drawing with foreground and background shapes
The students drawings are then photo-copied and transferred to the polyprint block. Students use the photocopy to press through onto polyboard. The students are given a square and a strip of polyprintboard . Students first of all experiment printing on paper with their design and border. Students can do a black and white print or do a polyprint print of two colours overlaying their inks.
The slide presentation gives you also opportunities for reflection and evaluation of outcome at the end.
I have presented my artists in my book
I have compared the works of 2 nature artists
I have written a short paragraph on the style of artists
I have a careful line drawing of my subject
I have created my own artwork based on my research of subject colour
I have a plan for my print design and have written about relief printing
I have tested working with polyprints
Student outcome is a wall-hanging and we sewed all the students outcomes together to make a fabric collage of squares.
This is a summary for files - a 5 min Scheme of Work to help with having all the essential information required. This is my project Modern Movements - cupcakes where students make a cupcake in various different modern art styles: Expressionism - black and white polyprint, Neo-Impressionism stippling and dots with paint or crayon, Fauvism - splash arbitrary colours and learn how to use water-colour, Realism - pencil shading accurately, Surrealism - make a magical fantasy creature like Miro to go on the cupcake. There is a Scheme of work for this unit.
There are a number if pictures resourced that relate to the song ‘12 days of Xmas’
Lyrics
On the first day of Christmas
My true love sent to me
A partridge in a pear tree
On the second day of Christmas
My true love sent to me
Two turtle-doves
And a partridge in a pear tree
On the third day of Christmas
My true love sent to me
Three French hens
Two turtle-doves
And a partridge in a pear tree
On the fourth day of Christmas
My true love sent to me
Four calling birds
Three French hens
Two turtle-doves
And a partridge in a pear tree
On the fifth day of Christmas
My true love sent to me
Five golden rings (five golden rings)
Four calling birds
Three French hens
Two turtle-doves
And a partridge in a pear tree
On the sixth day of Christmas
My true love sent to me
Six geese a laying
Five golden rings (five golden rings)
Four calling birds
Three French hens
Two turtle-doves
And a partridge in a pear tree
On the seventh day of Christmas
My true love sent to me
Seven swans a swimming
Six geese a-laying
Five golden rings (five golden rings)
Four calling birds
Three French hens
Two turtle-doves
And a partridge in a pear tree
On the eighth day of Christmas
My true love sent to me
Eight maids a milking
Seven swans a swimming
Six geese a-laying
Five golden rings (five golden rings)
Four calling birds
Three French hens
Two turtle-doves
And a partridge in a pear tree
On the ninth day of Christmas
My true love sent to me
Nine ladies dancing
Eight maids a-milking
Seven swans a-swimming
Six geese a-laying
Five golden rings (five golden rings)
Four calling birds
Three French hens
Two turtle-doves
And a partridge in a pear tree
On the tenth day of Christmas
My true love sent to me
Ten lords a-leaping
Nine ladies dancing
Eight maids a-milking
Seven swans a-swimming
Six geese a-laying
Five golden rings (five golden rings)
Four calling birds
Three French hens
Two turtle-doves
And a partridge in a pear tree
On the 11th day of Christmas
My true love sent to me
I sent 11 pipers piping
Ten lords a-leaping
Nine ladies dancing
Eight maids a-milking
Seven swans a-swimming
Six geese a-laying
Five golden rings (five golden rings)
Four calling birds
Three French hens
Two turtle-doves
And a partridge in a pear tree
On the 12th day of Christmas
My true love sent to me
12 drummers drumming
Eleven pipers piping
Ten lords a-leaping
Nine ladies dancing
Eight maids a-milking
Seven swans a-swimming
Six geese a-laying
Five golden rings (five golden rings)
Four calling birds
Three French hens
Two turtle-doves
And a partridge in a pear tree
And a partridge in a pear tree