Hello!
Welcome to Clay Projects for Schools.
Simple, fun, creative, tried and tested projects for children using clay.
No experience necessary from adults or children.
All projects are made with up to four simple shapes, a ball, a bean, a sausage and a carrot.
Each resource has a demonstration, step by step photographic instructions and preparation notes.
I have over 25 years experience creating clay projects for children in schools and museums and am also a TA in Primary Schools.
Here’s how to make a plasticine Eye of Horus with easy to follow, child friendly, step by step instructions.
Suitable for children aged 7 and upwards including SEN children.
Great for topics about Ancient Egypt. This also works well for after school clubs, as a golden time activity and can be completed in the space of a lesson (up to an hour and a half).
This project works best as a one to one activity or in small groups.
What you need:
yellow plasticine
blue plasticine
rolling pin
mat to work on
pencils
tea towel
What you get:
Powerpoint step by step instructions - ‘I can make an Eye of Horus’ (for children who are right handed)
Powerpoint step by step instructions - ‘I can make an Eye of Horus’ (for children who are left handed)
Printable step by step instructions for ‘I can make an Eye of Horus’ (both left and right handed versions).
Video animations showing how to make an Eye of Horus (one for left handed children and one for right handed children)
Video showing how to make a ball
Video showing how to flatten your plasticine with a rolling pin
Video showing how to roll thin sausage shapes
Information for teachers:
How the projects work
Things you will need
Lesson plan
Preparing for your workshop
Health and Safety
Certificate of Achievement
These projects help children learn and practice basic skills which can then be used to create their own projects and enhance their own creativity. Although your children are making the same project, they will all look different.
Mini makes are fun projects to make that use very small amounts of air-drying clay.
Here’s how to make Christmas tree star decorations with video demonstrations and easy to follow, child friendly, step by step instructions. These decorations are simple to make and great practice for improving dexterity and fine motor skills. Once finished, you could use the decorations to decorate a classroom tree before the children take them home.
There are three versions to choose from that cover nearly all ages and abilities. The easiest decoration uses a lolly stick and is suitable for children in Reception and Year 1.
The other two versions use strips of thin cardboard to make the stars and are suitable for children aged 7 and upwards. This project is also suitable for children with special educational needs and those who need help with their mental wellbeing.
This project also works best as a one to one activity or in small groups and is suitable for after school clubs or as a golden time activity.
What you need:
DAS clay
pencils
lolly sticks
pots of water
Paintbrush
Strip of thin cardboard
Paperclip
Ribbon or string
Mat to work on
What you get:
Powerpoint step by step instructions - ‘I can make a Christmas tree star decoration 1.’
Powerpoint step by step instructions - ‘I can make a Christmas tree star decoration 2.’
Powerpoint step by step instructions - ‘I can make a Christmas tree star decoration 3.’
Video showing how to make a Christmas tree star decoration version 1.’
Video showing how to make a Christmas tree star decoration version 2.’
Video showing how to make a Christmas tree star decoration version 3.
Video showing how to fix big cracks in the clay’
Information for teachers:
How the projects work
Things you will need
Lesson plan
Preparing for your workshop (including tips for decorating)
Health and Safety
Certificate of Achievement
These projects help children learn and practice basic skills which can then be used to create their own projects and enhance their own creativity. Although your children are making the same project, they will all look different.
Here’s how to make a nocturnal animal out of clay with video demonstrations and easy to follow, child friendly, step by step instructions. This project can be used alongside nature/animal/habitat topics or just as something fun to make! I have made this project in the past with children who had the book ‘Owl Babies’ as their English topic. Ideal as part of an art day/art week.
There are three versions to chooses from:
Oval owl in a tree
Oval owl in a tree with the moon
Round owl in a tree with a spider’s web (this version would be suitable for Halloween.)
Suitable for children aged 7 and upwards including SEN children and any child needing additional support. If you are new to clay, allow a whole afternoon to make this project if you can. I have made this project with children in Year 1 and would suggest making it in small groups at a time.
This project is made using three basic shapes, a ball, a bean, and a sausage shape. There is also a video included demonstrating how to make these shapes.
This project can also work as a one to one activity or in small groups.
What you need:
clay
pencils
lolly sticks
Lid of a marker pen (for the moon)
pots of slip or water
paintbrushes
acrylic paints
What you get:
Powerpoint step by step instructions - ‘I can make an owl in a tree’
Powerpoint step by step instructions - ‘I can make an owl in a tree with a spider too’
Powerpoint step by step instructions - ‘I can make an owl in a tree with the moon’
Powerpoint step by step instructions - ‘How to paint your owl’
Video showing how to make an owl in a tree
Video showing how to make an owl in a tree with a spider too
Video showing how to make an owl in a tree with the moon
Video showing how to make paint your owl
Video showing how to make four basic shapes (ignore the carrot shape)
Video showing how to press your clay flat
Information for teachers:
How the projects work
Things you will need
Lesson plan
Preparing for your workshop (including tips for decorating)
Health and Safety
How to recycle your clay
Handling clay
Looking after your clay
Certificate of Achievement
These projects help children learn and practice basic skills which can then be used to create their own projects and enhance their own creativity. Although your children are making the same project, they will all look different.
Here’s how to make two versions of a Harvest wheatsheaf with video demonstrations and easy to follow, child friendly, step by step instructions. This project can be used alongside Harvest festival celebrations or just as something fun to make!
Suitable for children aged 7 and upwards including SEN children and any child needing additional support. If you are new to clay, allow a whole afternoon to make this project if you can.
This project is made using four basic shapes, a ball, a bean, a sausage and a carrot shape. There is also a video included demonstrating how to make these shapes.
This project can also work as a one to one activity or in small groups.
What you need:
clay
pencils
lolly sticks
pots of slip or water
paintbrushes
acrylic paints
What you get:
Powerpoint step by step instructions - ‘I can make a Harvest wheatsheaf version 1.’
Powerpoint step by step instructions - ‘I can make a Harvest wheatsheaf version 2.’
Video showing how to make a Harvest wheatsheaf version 1.
Video showing how to make a Harvest wheatsheaf version 2.
Video showing how to make four basic shapes
Video showing how to press your clay flat
Information for teachers:
How the projects work
Things you will need
Lesson plan
Preparing for your workshop (includes tips for decorating)
Health and Safety
How to recycle your clay
Handling clay
Looking after your clay
Certificate of Achievement
These projects help children learn and practice basic skills which can then be used to create their own projects and enhance their own creativity. Although your children are making the same project, they will all look different.
Here’s how to make a play-doh fish step by step. This project has been designed to be used as a one to one activity for SEN children, for children who need help with their mental well-being and as a small group activity for children. Great for nature, underwater or seaside themed topics. Suitable for children aged 4 and upwards.
What you need:
Play-doh
lolly sticks
pencils or thin paintbrushes
What you get:
Powerpoint step by step instructions - ‘I can make a play-doh fish’
Printable step by step worksheet instructions
Video animation showing how to make a play-doh fish.
Video showing how to make four basic shapes
Information for teachers:
How the projects work
Things you will need
Lesson plan
Preparing for your workshop
Health and Safety
Certificate of Achievement
Here’s how to make a reindeer out of clay with a video demonstration and easy to follow, child friendly, step by step instructions. This project can be used alongside animal or Christmas topics or just as something fun to make! If you are a forest school you could have a separate activity for the children looking for small twigs for the antlers. Ideal as part of an art day/art week.
Suitable for children aged 7 and upwards including SEN children and any child needing additional support. If you are new to clay, allow a whole afternoon to make this project if you can.
This project is made using four basic shapes, a ball, a bean, a sausage and a carrot shape. There is also a video included demonstrating how to make these shapes.
This project can also work as a one to one activity or in small groups. There are no variations of this project.
What you need:
clay
pencils
lolly sticks
brown felt tip pens
craft matchsticks
small twigs for the antlers
pots of slip or water
paintbrushes
acrylic paints
What you get:
Powerpoint step by step instructions - ‘I can make a reindeer’
Powerpoint step by step instructions - ‘How to paint your reindeer’
Video showing how to make a reindeer
Video showing how to make four basic shapes
Information for teachers:
How the projects work
Things you will need
Lesson plan
Preparing for your workshop (including tips for decorating)
Health and Safety
How to recycle your clay
Handling clay
Looking after your clay
Certificate of Achievement
These projects help children learn and practice basic skills which can then be used to create their own projects and enhance their own creativity. Although your children are making the same project, they will all look different.
Here’s how to make a medieval shield out of clay with video demonstrations and easy to follow, child friendly, step by step instructions. There are eight different designs to choose from. This project can be used alongside a history topic or just as something fun to make!
This project is suitable for children aged 7 and upwards. If you are new to clay, allow a whole afternoon to make this project if you can.
This project is made using three basic shapes, a ball, a bean and a sausage shape. There is also a video included demonstrating how to make these shapes.
This project can also work as a one to one activity or in small groups.
What you need:
clay
pencils
lolly sticks
pots of slip or water
paintbrushes
acrylic paints
metallic acrylic paints
What you get:
Powerpoint step by step instructions - ‘I can make a Medieval shield versions 1 - 8’
Powerpoint step by step instructions - ‘Things to watch out for’
Video showing how to make a Medieval shield versions 1 - 8
Video showing how to make four basic shapes
Video showing how to flatten clay
Information for teachers:
How the projects work
Things you will need
Lesson plan
Preparing for your workshop (including tips for decorating)
Health and Safety
How to recycle your clay
Handling clay
Looking after your clay
Certificate of Achievement
These projects help children learn and practice basic skills which can then be used to create their own projects and enhance their own creativity. Although your children are making the same project, they will all look different.
Here is some information on different methods of joining stoneware or earthenware clay.
What you get:
Powerpoint showing different methods of joining.
Video showing how to join things using the ‘slipping and scoring’ method (also known as cross-hatching).
Video showing how to make slip.
Here’s how to make a bird in a nest out of clay with a video demonstration and easy to follow, child friendly, step by step instructions. This project can be used alongside nature or Easter topics or just as something fun to make! Ideal as part of an art day/art week.
Suitable for children aged 6 and upwards including SEN children and any child needing additional support. If you are new to clay, allow a whole afternoon to make this project if you can.
This project is made using three basic shapes, a ball, a bean, and a sausage shape. There is also a video included demonstrating how to make these shapes.
This project can also work as a one to one activity or in small groups. There are no variations of this project.
What you need:
clay
pencils
lolly sticks
pots of slip or water
paintbrushes
acrylic paints
What you get:
Powerpoint step by step instructions - ‘I can make a bird in a nest’
Powerpoint step by step instructions - ‘Things to watch out for’
Video showing how to make a bird in a nest
Video showing how to make four basic shapes
Information for teachers:
How the projects work
Things you will need
Lesson plan
Preparing for your workshop (including tips for decorating)
Health and Safety
How to recycle your clay
Handling clay
Looking after your clay
Certificate of Achievement
These projects help children learn and practice basic skills which can then be used to create their own projects and enhance their own creativity. Although your children are making the same project, they will all look different.
Here’s how to make a play-doh minibeast on a leaf with video demonstrations and easy to follow, child friendly, step by step instructions. The children make a leaf then add either a ladybird, butterfly, caterpillar, beetle or worm. This project has been designed to be used as a small group activity for children, or as a one to one activity for SEN children or for children who need help with their mental well being. Suitable for EYFS children and older children too. Great for nature themed topics. Ideal as part of an art day/art week.
What you need:
Play-doh
lolly sticks
pencils
What you get:
Powerpoint step by step instructions - How to make a leaf
Powerpoint step by step instructions - How to make a beetle
Powerpoint step by step instructions - How to make a butterfly
Powerpoint step by step instructions - How to make a ladybird
Powerpoint step by step instructions - How to make a caterpillar
Powerpoint step by step instructions - How to make a worm
Video demonstration - I can make a leaf
Video demonstration - I can make a beetle on a leaf
Video demonstration - I can make a butterfly on a leaf
Video demonstration - I can make a ladybird on a leaf
Video demonstration - I can make a caterpillar on a leaf
Video demonstration - I can make a worm on a leaf
Information for teachers:
How the projects work
Things you will need
Lesson plan
Preparing for your workshop
Health and Safety
Certificate of Achievement
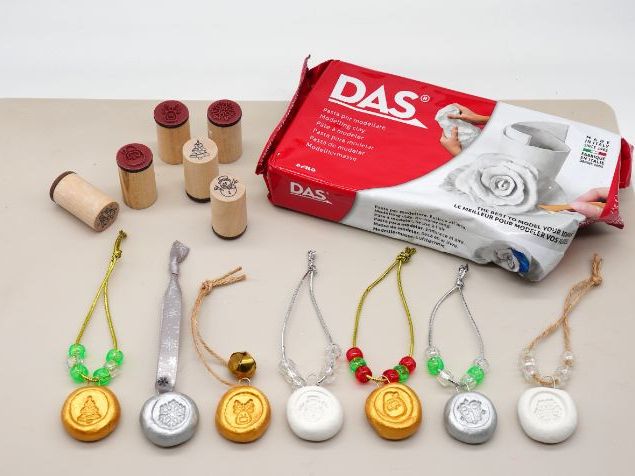
This is a really super simple project to make for Christmas. It is an easy small group activity which produces a lovely keepsake that children can use to decorate their Christmas tree for years to come. I usually make it with children in Reception but it is suitable for all ages.
What you need:
1kg white DAS per class
paperclips
Christmas rubber stamps
metallic acrylic paints (optional)
ribbon, jute string or metallic cord
little beads or bells
paintbrushes
What you get:
Powerpoint step by step instructions - ‘Christmas tree decoration’
Project information
Health and Safety information
Here’s how to make a Viking head out of clay with video demonstrations and easy to follow, child friendly, step by step instructions. This project can be used alongside a history topic or just as something fun to make!
This project is suitable for children aged 7 (Year 2) and upwards. If you are new to clay, allow a whole afternoon to make this project if you can.
This project is made using four basic shapes, a ball, a bean, a sausage and a carrot shape. There is also a video included demonstrating how to make these shapes.
This project also works as a one to one activity or in small groups. It is also one of my favourite projects as every Viking head I have ever seen made by a child looks different. I have put some examples of children’s work in with the information for teachers.
What you need:
clay
pencils
lolly sticks
wooden forks (optional)
pots of slip or water
paintbrushes
acrylic paints
metallic acrylic paints
What you get:
Powerpoint step by step instructions - ‘I can make a Viking head 1.’
Powerpoint step by step instructions - ‘I can make a Viking head 2.’
Powerpoint - ‘Variations’
Powerpoint - ‘Things to watch out for’
Powerpoint - ‘Different ways to join clay’
Powerpoint step by step instructions - ‘How to paint your Viking head’
Video showing how to make a Viking head 1.
Video showing how to make a Viking head 2.
Video showing how to paint a viking head 1.
Video showing how to paint a viking head 2.
Video showing how to make four basic shapes
Video showing how to flatten clay
Information for teachers:
How the projects work
Things you will need
Lesson plan
Preparing for your workshop (including tips for decorating)
Health and Safety
How to recycle your clay
Handling clay
Looking after your clay
Certificate of Achievement