Lifeboat Teachers provides ready-to-use resources that help teachers save time and reduce stress. Whether you need a last-minute lesson or are planning ahead, we’ve got you covered. All resources are easy to adapt and ready to go, making teaching smarter and easier. Let us throw you a lifeline and keep you afloat in the world of teaching!
Lifeboat Teachers provides ready-to-use resources that help teachers save time and reduce stress. Whether you need a last-minute lesson or are planning ahead, we’ve got you covered. All resources are easy to adapt and ready to go, making teaching smarter and easier. Let us throw you a lifeline and keep you afloat in the world of teaching!
Mole calculations with Avogadro constant, calculating the number of particles, number of moles, relative molecular mass and molar mass. Include moles exam style questions. All the slides in this lesson are fully animated and include answers to every mini plenary question and exam question. The breakdown of the slides is as follows:
Slide 1 - Title and 5-minute starter. The starter is a grid of four questions entitled ‘last week, last lesson, today’s learning and future learning’. Use this generic slide for all of your lessons by simply changing the questions and the answers each time.
Slide 2 - Lesson objectives (see above)
Slide 3 – Introduction to the definition of a mole
Slide 4 – Example of a mole using a high-quality photo of ‘one mole’ of locusts
Slide 5 – Definition of Avogadro’s constant
Slide 6 – Mini plenary/learning pit stop. Three questions of increasing difficulty to check students’ understanding thus far. Answers animate onto the screen.
Slide 7 – Introduction to the concept of molar mass
Slide 8 – Example of molar mass being calculated using ethene
Slide 9 – number of moles = mass/molar mass (presented as equation and formula triangle, depending on mathematical ability of students)
Slides 10 – 12: worked examples of increasing difficulty, all with working out and answers that animate onto the screen
Slide 13 - Mini plenary/learning pit stop. Three questions of increasing difficulty to check students’ understanding thus far. Answers animate onto the screen.
Slide 14 - number of particles = number of moles x Avogadro constant (presented as equation and formula triangle, depending on mathematical ability of students)
Slide 15 – Worked example with new formula for finding number of particles
Slide 16 – Final mini plenary/learning pit stop. Three questions of increasing difficulty to check students’ understanding thus far. Answers animate onto the screen.
Slides 17 – 20: Exam questions with mark scheme answers (all included with this resource)
If you have a positive experience with the resource please leave a positive review! This really helps promote my store!
Atomic orbitals and electronic configurations lesson, plus: 1s notation, electrons-in-boxes, Aufbau principle, Hund’s rule, and chromium and copper exceptions! This is a Year 12 A level lesson for Edexcel International Unit 1 – WCH11, but it can also be used for all UK exam boards. All the slides in this lesson are fully animated and include answers to every mini plenary question and exam question. The breakdown of the slides (which are best opened on Microsoft PowerPoint) is as follows:
Slide 1 - Title and 5-minute starter. The starter is a grid of four questions entitled ‘last week, last lesson, today’s learning and future learning’. Use this generic slide for all of your lessons by simply changing the questions and the answers each time.
Slide 2 - Lesson objectives (see thumbnail image)
Slide 3 – Electrons do not orbit the nucleus!! Drill this into their heads!
Slide 4 – 5: Electrons in classical physics and quantum physics. There is an embedded video by Dr Quantum which explores Young’s double slit experiment
Slides 6 – 7: The Heisenberg uncertainty principle is discussed
Slide 8 – explaining electrons using quantum theory
Slide 9 – energy level diagram for sodium
Slide 10 –14 : sub-division of quantum shells into sub-shells and orbitals fully explained
Slides 15 – 16: shapes of orbitals discussed
Slide 17 – learning pit-stop to check students’ learning. A series of questions of increasing difficulty, with the stretch and challenge (S+C) being the hardest. Answers animate onto the screen when you click
Slides 18 – 23: Electronic configurations introduced here with the Aufbau principle and Hund’s rule
Slide 24 – Worked examples of electrons-in-boxes and 1s notation
Slide 25 - learning pit-stop to check students’ learning. A series of questions of increasing difficulty, with the stretch and challenge (S+C) being the hardest. Answers animate onto the screen when you click
Slides 26 – 29: The link between electronic configurations and atomic emission spectra
Slides 30 – 31: Independent practice (worksheet and answers included with the resource)
If you have a positive experience with the resource please leave a positive review! This really helps promote our store! Thanks!
Empirical formula lesson with questions and answers. Includes combustion analysis problems and converting molecular formula to empirical formula. A level and GCSE chemistry suitable. All the slides in this lesson are fully animated and include answers to every mini plenary question and exam question. The breakdown of the slides is as follows:
Slide 1 - Title and 5-minute starter. The starter is a grid of four questions entitled ‘last week, last lesson, today’s learning and future learning’. Use this generic slide for all of your lessons by simply changing the questions and the answers each time.
Slide 2 - Lesson objectives (see thumbnail image)
Slide 3 – Definition of empirical formula and example of how to convert molecular formula to empirical formula
Slide 4 – Independent practice: converting molecular formula to empirical formula. Answers animate onto the screen
Slide 5 – Worked example 1 - Calculating empirical formula from experimental data. This is the question in the slide: A sample of a compound contains 1.27 g of copper and 0.16 g of oxygen. Calculate the empirical formula. Live model on white board. Answer is Cu2O
Slides 6 – Worked example 2 (harder question)
Slide 7 – Worked example 3 (harder still)
Slide 8 – Introduction to the following experiment: Reduction of copper(II) oxide. Students are asked to write down the chemical and symbol equation for the reaction. Answers animate onto the screen
Slide 9 – Students will now be guided through the process of finding the empirical formula of the copper oxide. On this slide, they are given the data obtained from the experiment. Which subtractions must they make to find the mass of copper? Answers animate onto the screen
Slide 10 – Which subtractions must they make to find the mass of oxygen? Answers animate onto the screen
Slide 11 – Students will now be shown how to work out the empirical formula of the copper oxide using the masses of copper and oxygen which they calculated
Slides 12 - 14 Calculation using combustion analysis – worked example. Students will be shown step-by-step with animations, how to first find the mass of carbon, then the mass of hydrogen and finally the mass of oxygen. From here, the empirical formula calculation is a piece of cake.
Slide 15 – Mini plenary question on combustion analysis
Slide 16 – Answer to mini plenary animates onto the screen
Slides 17 – 21 - Exam questions with answers that animate onto the screen (all included with this resource)
If you have a positive experience with the resource please leave a positive review! This really helps promote my store!
IGCSE Edexcel Chemistry solubility curves and solubility practical. Solubility definition and units of solubility, with solubility exam questions. Lesson objectives: Define key terms relating to solubility, Define solubility and Investigate the solubility of a solid in water at a specific temperature. All the slides in this lesson are fully animated and include answers to every mini plenary question and exam question.
The breakdown of the slides is as follows:
Slide 1 - Title and 5-minute starter. The starter is a grid of four questions entitled ‘last week, last lesson, today’s learning and future learning’. Use this generic slide for all of your lessons by simply changing the questions and the answers each time.
Slide 2 - Lesson objectives (see above)
Slide 3 – matching activity for the key terms linking to solubility, e.g. solvent, solute, solubility, etc.
Slides 4 – 5 – printable copies of slide 3 for students
Slide 6 – diagram introduction to practical
Slide 7 – method for practical (step-by-step)
Slide 8 – results grid where students will record their data
Slide 9 – introduction to solubility curves
Slide 10 - If you had 180 g of KNO3 at 80℃, it would look like the first photo. However, if you cool the solution down to 40℃, it would look like the second photo, as the mass of salt which cannot dissolve at the lower temperature crystallises out of solution
Slides 11 – 13 – series of worked examples of solubility curve problems. Answers animate on to the screen as you click (don’t worry!)
Slide 14 – data for students to draw their own solubility curve (graph paper not provided)
Slide 15 - WAGOLL
Slide 16 – ALT (Applied learning time). Questions that require students to interpret the solubility they have drawn to answer. If they were not able to draw it, print slide 15 for them and have them use it to answer the questions.
Slide 17 – Answers
Slide 18 – Exam question slide
Slide 19 – mark scheme
If you have a positive experience with the resource please leave a positive review!
Reactions of acids with metals, acids with metal oxides and insoluble hydroxides, acids with alkalis and acids with metal carbonates. Chemical and ionic equations, examples with questions and answers. Lesson objectives: relate ionic and full equations, with state symbols, to observations from simple test-tube reactions, for reactions of acids. All the slides in this lesson are fully animated and include answers to every mini plenary question and exam question. The breakdown of the slides is as follows:
Slide 1 - Title and 5-minute starter. The starter is a grid of four questions entitled ‘last week, last lesson, today’s learning and future learning’. Use this generic slide for all of your lessons by simply changing the questions and the answers each time.
Slide 2 - Lesson objectives (see above)
Slide 3 – Recap slide covering acids that students should be familiar with from GCSE level
Slide 4 – Acids with metals, including the general equation, symbol equation, ionic equation and exploration as to whether or not it is neutralisation and/or redox
Slide 5 – Acids with metal oxides and insoluble metal hydroxides, including the general equation, symbol equation, ionic equation and exploration as to whether or not it is neutralisation and/or redox
Slide 6 – Acids with alkalis, including the general equation, symbol equation, ionic equation and exploration as to whether or not it is neutralisation and/or redox
Slide 7 – Acids with metal carbonates, including the general equation, symbol equation, ionic equation and exploration as to whether or not it is neutralisation and/or redox
Slide 8 – Mini plenary/learning pit stop. Three questions of increasing difficulty to check students’ understanding thus far. Answers animate onto the screen.
Slide 9 – Exam questions place holder slide
Slide 10 – 20 answers to exam questions per slide
If you have a positive experience with the resource please leave a positive review!
ammonium chloride ring demonstration and potassium permanganate dilution. Particle theory lesson with questions and answers for IGCSE Chemistry, arrangement, movement and energy of the particles. Lesson objectives: Describe the movement, arrangement and energy of the particles in solids, liquids and gases, State the names of the interconversions between solids, liquids and gases and Explain how these interconversions are achieved and how they change the arrangement, movement and energy. All the slides in this lesson are fully animated and include answers to every mini plenary question and exam question. The breakdown of the slides is as follows:
Slide 1 - Title and 5-minute starter. The starter is a grid of four questions entitled ‘last week, last lesson, today’s learning and future learning’. Use this generic slide for all of your lessons by simply changing the questions and the answers each time.
Slide 2 - Lesson objectives (see above)
Slide 3 – TPS – how do we know substances are made of particles?
Slides 4 - 6 – Evidence of particles from Brownian motion, gold foil experiment and images from STMs can be explored. Gifs on slides to help with this.
Slides 7-11 – This section is when the demonstration of ammonia gas reacting with hydrogen chloride gas can be done. The demonstration should be done using the POE model (predict – observe – explain)
Slide 12 – Second demonstration (potassium permanganate dissolving in hot and cold water). Do this live or use the video embedded in the PowerPoint
Slide 13 – Explanation to the demonstration
Slide 14 – 16 - Information on movement, arrangement and energy of particles for teacher to deliver
Slide 17 – Mini plenary questions. Questions are differentiated and scaffolded, including a challenge question. Answers animate onto the screen as you click
Slides 18 – 19 – Information for teacher to deliver on compressibility of solids, liquids and gases. Visuals on each slide to support dual coding
Slide 20 - Mini plenary questions. Questions are differentiated and scaffolded, including a challenge question. Answers animate onto the screen as you click
Slide 21 – diagram showing the interconversions of the states of matter, including sublimation
Slide 22 – Phet simulation instructions (only possible if students have their own laptops)
Slide 23 – Phet simulation link in the notes section of the slide. Simulation also embedded on this slide, so you can model to them how to use it if you want
Slide 24 - Mini plenary questions. Questions are differentiated and scaffolded, including a challenge question. Answers animate onto the screen as you click
Slides 25 – 26 – Plenary (exam questions)
Phet states of matter simulation: https://phet.colorado.edu/sims/html/states-of-matter-basics/latest/states-of-matter-basics_en.html
Follow me on Twitter https://twitter.com/MC_Afrique
If you have a positive experience with the resource please leave a positive review!
Ionic equation examples and ionic equations A level Chemistry lesson with questions and answers interspersed. Lesson objectives: write balanced full and ionic equations, including state symbols, for chemical reactions. All the slides in this lesson are fully animated and include answers to every mini plenary question and exam question. The breakdown of the slides is as follows:
Slide 1 - Title and 5-minute starter. The starter is a grid of four questions entitled ‘last week, last lesson, today’s learning and future learning’. Use this generic slide for all of your lessons by simply changing the questions and the answers each time.
Slide 2 - Lesson objectives (see above)
Slide 3 – Ionic equation rules
Slide 4 – Worked example using the reaction between magnesium and hydrochloric acid of how to write an ionic equation
Slide 5 – Halogen displacement example for students to attempt on the mini whiteboard. Correct ionic equation animates on the screen
Slide 6 – Independent learning task, five reactions for which students must write the ionic equations and identify oxidising and reducing agents
Slide 7 – 11 – answers animate onto the screen slide by slide
Slide 12 – tricky example for students to attempt involving precipitation. Explanation and answer animates on the screen
Slide 13 – ALT (Applied learning time). 5 exam style questions of increasing difficulty worth a total of seven marks and designed to test students’ understanding of the whole lesson. Answers animate onto the screen.
If you have a positive experience with the resource please leave a positive review! This really helps promote my store!
Mass spectrometry principle A level Chemistry, including mass spectrometry problems and solutions, and mass spectrometry Save My Exams examples and diatomic molecules.
All the slides in this lesson are fully animated and include answers to every mini plenary question and exam question.
The breakdown of the slides is as follows:
Slide 1 - Title and 5-minute starter. The starter is a grid of four questions entitled ‘last week, last lesson, today’s learning and future learning’. Use this generic slide for all of your lessons by simply changing the questions and the answers each time.
Slide 2 - Lesson objectives (see above)
Slide 3 explanation of the term ‘relative atomic mass’ by means of a picture (dual coding)
Slides 4 – written definitions of both relative atomic mass and relative isotopic mass
Slide 5 – introduction to the mass spectrometer
Slide 6 – photo of an actual mass spectrometer
Slide 7 – short, embedded video, explaining the principle of the mass spectrometer
Slide 8 – labelled diagram of a mass spectrometer which closely resembles what a student might see in an exam
Slides 9 – 12 – outline of how a mass spectrometer works, from ionisation, acceleration, deflection and detection
Slides 13 - 15 – mass spectrometry of an element, with worked examples and mini plenary questions on calculating relative atomic mass from a mass spectrum with answers
Slide 16 – 19 – this section deals with mass spectrometry of diatomic molecules, namely chlorine. Students are introduced to the concept of the unfragmented molecular ion and explanation of how this produces the peaks at 70, 72 and 74 are offered. The math behind the ratios (9:6:1) is also explained
Slides 20 – 22 – this last section of teaching covers mass spectrometry of polyatomic molecules. For the Edexcel specification, students only need to be aware of the significance of the M as the relative molecular mass and the M+1 peak being caused by C-13. Slide 22 has an image of the mass spectrum of pentane, showing clearly the M peak.
Slide 23 – Exam questions slide
Slides 24 – 28 – mark scheme answer for each question as you click!
If you have a positive experience with the resource please leave a positive review!
Motor effect GCSE Physics lesson including Flemming’s left hand rule, magnetic flux density, Fleming’s left-hand rule, electromagnets, motor effect practical and DC motors with questions and answers throughout the lesson. The lesson objectives are as follows: Describe how a magnet and a current-carrying conductor exert a force on one another, Show that Fleming’s left-hand rule represents the relative orientations of the force, the current and the magnetic field and Apply the equation that links the force on a conductor to the magnetic flux density, the current and the length of conductor to calculate the forces involved. The slides are fully animated and include answers to every mini plenary question and exam question. The breakdown of the slides is as follows:
Slide 1 - Title and 5-minute starter. The starter is a grid of four questions entitled ‘last week, last lesson, today’s learning and future learning’. Use this generic slide for all of your lessons by simply changing the questions and the answers each time.
Slide 2 - Lesson objectives (see above)
Slide 3 – Hinge question: What will happen when a wire with current flowing through it and the magnet are brought close to one another?
Slide 4 – A demonstration of the motor effect using a cell, a piece of wire, a screw and a neodymium magnet. This can be done as a class practical if there is enough equipment.
Slide 5 – Explanation of what the class observed in the demo/practical
Slide 6 – Definition of motor effect presented to class: A wire carrying a current creates a magnetic field. This can interact with another magnetic field, causing a force that makes the wire move.
Slide 7 - Mini plenary. Three questions of increasing difficulty. Answers animate onto the screen
Slide 8 – Introduction to Fleming’s left-hand rule (LHR)
Slide 9 – Fleming’s left-hand rule visual aid with useful acronym
Slide 10 – Worked example of how to use Fleming’s LHR
Slide 11 – Mini plenary. Students attempt to use Fleming’s LHR to work out the direction of movement. Answers animate onto the screen
Slide 12 – Introduction to the calculation of forces involved in the motor effect
Slide 13 - 𝐹=𝐵𝐼𝑙 equation, with symbols and units given
Slide 14 – Worked example using the 𝐹=𝐵𝐼𝑙 equation
Slide 15 – Mini plenary. Questions testing students’ knowledge of the 𝐹=𝐵𝐼𝑙 equation. Answers animate onto the screen
Slide 16 – ALT (Applied Learning Time) Students work independently during this stage of the lesson, answering questions linked to the objectives of the lesson. Answers animate onto the screen at the click of a button.
Slides 17-21 – Plenary. Short-answer exam questions with answers that animate on to the screen
Specific heat capacity lesson, including equation of specific heat capacity definition with calculation questions and answers, plus internal energy definition physics. The lesson objectives are as follows: Define internal energy and how it is affected by heat, state the factors that affect the change in thermal energy of a system and apply the equation and the concept of specific heat capacity to problems.
The slides are fully animated and include answers to every mini plenary question and exam question. The breakdown of the slides is as follows:
Slide 1 - Title and 5-minute starter. The starter is a grid of four questions entitled ‘last week, last lesson, today’s learning and future learning’. Use this generic slide for all of your lessons by simply changing the questions and the answers each time.
Slide 2 - Lesson objectives (see above)
Slide 3 - Recap of definition of system and introduction to definition of internal energy
Slide 4 - Explanation of what happens to the internal energy when heat is applied to the system
Slide 5 - Mini plenary. 4 questions of increasing difficulty that test definitions and explanations that students have just learnt. Answers animate onto the screen
Slide 6 - Introduction to the factors that affect the change in thermal energy of a system
Slide 7 - Mini plenary. Random name animation used to test pupils’ recall of the factors that affect the change in thermal energy in a system
Slide 8 - Introduction to specific heat capacity equation with the units. All parts animate onto the screen at your leisure
Slide 9 - Worked example 1 SHC calcuation with step-by-step answer animation
Slide 10 - Worked example 2 SHC calcuation with step-by-step answer animation
Slide 11 - Mini plenary. SHC calculation 3-mark exam question with mark scheme answer animating onto screen.
Slide 12 - Explanation of why specific heat capacity is important, linking to its definition, i.e. useful to know as it can help people decide the best materials to use for buildings or cooking utensils
Slide 13 - Comparison of SHC of iron and SHC of wood. Iron’s SHC is much lower - what does this actually mean? All explained on this slide, which will help students frame their knowledge in a relevant context.
Slide 14 - Mini plenary to test last lesson objective (apply the concept of specific heat capacity to problems)
Slide 15 - ALT (Applied learning time). 6 mark synthesis exam question: “A student investigated the specific heat capacity of metals. Describe an experiment the student could do to measure the specific heat capacity of a metal.” Guidance animates onto the screen and then disappears, such as the need for a joulemeter.
Slide 16 - Plenary. Short 3-mark SHC calculation question
Follow me on Twitter https://twitter.com/MC_Afrique
If you have a positive experience with the resource please leave a positive review!
Potable water GCSE Chemistry lesson AQA combined science, including difference between potable water and pure water, treatment of sea water and freshwater to produce potable water, with questions and answers throughout. The lesson objectives are as follows: Distinguish between potable water and pure water, describe the differences in treatment of ground water and salty water and** justify** the steps used to produce potable water.
The slides are fully animated and include answers to every mini plenary question and exam question. The breakdown of the slides is as follows:
Slide 1 - Title and 5-minute starter. The starter is a grid of four questions entitled ‘last week, last lesson, today’s learning and future learning’. Use this generic slide for all of your lessons by simply changing the questions and the answers each time.
Slide 2 - Lesson objectives (see above)
Slide 3 - Introduction to the importance of water and what constitutes safe, drinking water
Slide 4 - Definition of potable water presented
Slide 5 - Concept of pure water introduced (Pure water contains water molecules and no other dissolved substances). A photo of a bottle of Evian water is used as the discussion point: Is this bottle of mineral water pure? Answer animates onto screen: No, as it contains other dissolved ions, e.g. potassium, nitrates and sodium
Slide 6 - Mini plenary. 3 questions testing pupils’ understanding of the difference between potable water and pure water. Answers animate onto the screen
Slide 7 - This slide introduces the question: How is potable water produced in the UK?
Slide 8 - Steps involved to produce potable water from freshwater, including selection of appropriate source of freshwater, definition of freshwater, filter beds and sterilising with chlorine, ozone or UV
Slide 9 - Parched photo of Sahara desert to introduce the question: How is potable water obtained in countries like Saudi Arabia where there are no rivers or lakes?
Slide 10 - Steps involved to produce potable water from seawater, including desalination, distillation and reverse osmosis.
Slide 11 - Mini plenary. 4 questions testing pupils’ understanding of the steps involved in producing potable water from freshwater and seawater. Answers animate onto the screen
Slide 12-16 - Exam questions on potable water with answers animating onto the screen from the mark scheme. The last question is worth four marks, which could be useful for extended writing
Follow me on Twitter https://twitter.com/MC_Afrique
If you have a positive experience with this resource please leave a positive review!
Energy stores and systems GCSE Physics lesson including worked examples of energy transfers with answers, energy change diagrams, system definition, and what happens to the energy when the system changes. The lesson objectives are as follows: Define, with examples, what a system is, explain how a system can be changed and recall the main energy stores and explain what happens to the energy when a system changes. The slides are fully animated and include answers to every mini plenary question and exam question. The breakdown of the slides is as follows:
Slide 1 - Title and 5-minute starter. The starter is a grid of four questions entitled ‘last week, last lesson, today’s learning and future learning’. Use this generic slide for all of your lessons by simply changing the questions and the answers each time.
Slide 2 - Lesson objectives (see above)
Slide 3 - System definition with examples
Slide 4 - Mini plenary. Random name animation used to test pupils’ recall of system definition
Slide 5 - Introduction to the three ways a system can be changed with an example of a man kicking a ball (Heating, work done by a force and work done when current flows).
Slide 6 - Mini plenary question: “This filament light bulb has just been switched on. How does this demonstrate a system being changed?” Answer animates directly onto screen
Slide 7 - Introduction to what happens to the energy when a system changes (When a system changes, energy is transferred from one energy store to another)
Slide 8 - KS3 recap of the main energy stores with photos to make the lesson more visual
Slide 9 - Example of energy transfer when an object is projected upwards. Answer animates as flow diagram with photo to make the lesson more visual
Slide 10 - Example of energy transfer when a moving object hits an obstacle. Answer animates as flow diagram with photo to make the lesson more visual
Slide 11 - Example of energy transfer when bringing water to boil in an electric kettle. Answer animates as flow diagram with photo to make the lesson more visual
Slide 12 - Mini plenary. Write down the energy transfers that take place when the following systems change:
A ball being dropped from a height and hitting the ground
A rubber band being stretched by a person and held
A handheld torch being used
A vehicle slowing down
Answers animate onto the screen as always
Slide 13 - ALT (Applied learning time). 3 mark exam question: Explain the energy changes in a book as it is resting on a shelf compared to when it is falling and hits the ground. Answer animates by paragraph onto the screen
This stage of the lesson is an opportunity for pupils to apply what they have learnt in the lesson
Slides 14-16 - Plenary. Short 1 and 2 mark exam questions with animated answers to wrap up an outstanding lesson and address any lingering misconceptions
Don’t forget to leave a positive review!
https://twitter.com/MC_Afrique
Electrolysis of aqueous solutions and electrolysis of ionic compounds with half equations. Lesson objectives: Predict the products of the electrolysis of binary ionic compounds in the molten state, write half equations for the reactions occurring at the electrodes during electrolysis and predict the products of the electrolysis of aqueous solutions containing a single ionic compound. This lesson follows on from the introduction lesson to electrolysis that can be found here. All the slides in this lesson are fully animated and include answers to every mini plenary question and exam question. The breakdown of the slides is as follows:
Slide 1 - Title and 5-minute starter. The starter is a grid of four questions entitled ‘last week, last lesson, today’s learning and future learning’. Use this generic slide for all of your lessons by simply changing the questions and the answers each time.
Slide 2 - Lesson objectives (see above)
Slide 3 – Recap slide from previous lesson on what happens when an ionic compound is melted or dissolved in water, i.e. the ions are free to move about within the liquid or solution
Slide 4 – An explanation of what you would see at each electrode during the electrolysis of molten sodium chloride, i.e. bubbles of chlorine gas at positive electrode and sodium metal coating the negative electrode
Slide 5 – Mini plenary/learning pit stop. Three questions of increasing difficulty to check students’ understanding thus far. Answers animate onto the screen.
Slide 6 – Introduction to half equations, the golden rule (Positive ions gain electrons to form elements and negative ions lose electrons to form elements) and OIL RIG all covered here
Slide 7 – Worked example of electrolysis of molten sodium chloride. Half equations animate onto the screen
Slide 8 – List of diatomic elements presented to students in the form of useful mnemonic (Have No Fear Of Ice Cold Beer)
Slide 9 – Exam-style question worth 4 marks: A student performs electrolysis of molten magnesium chloride. Predict the products at each electrode and write half equations for each electrode. Answers animate onto the screen as you click the mouse.
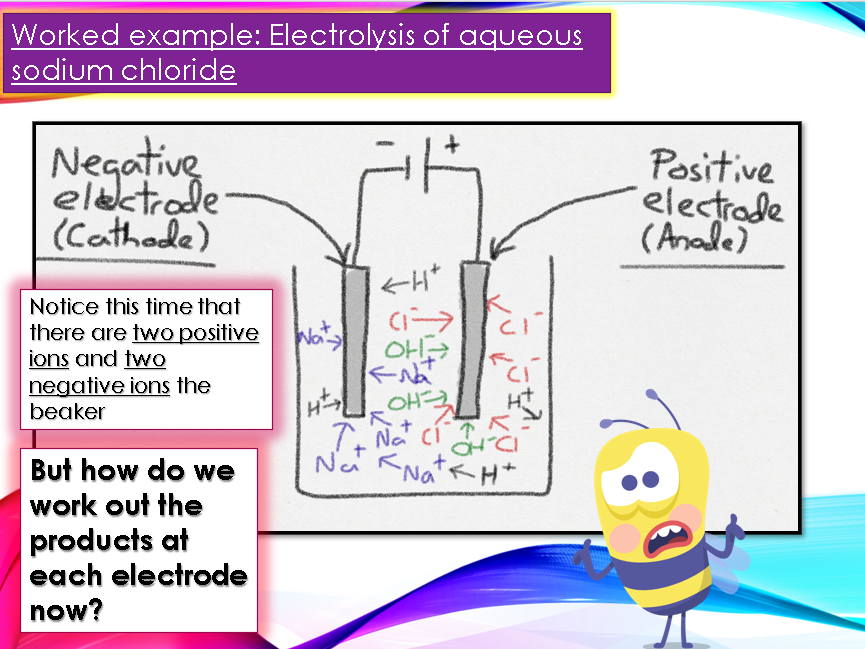
Slide 10 – Introduction to the electrolysis of aqueous solutions with mention of hydroxide and hydrogen ions from the water
Slide 11 – Diagram of electrolysis of aqueous sodium chloride solution showing all the ions present
Slide 12 – Golden rules to help students work out the products at each electrode: Hydrogen is produced at the negative electrode IF the metal is more reactive than hydrogen and Oxygen is produced at the positive electrode unless the solution contains halide ions, in which case the halogen is produced.
Slide 13 – Solutions given for the products at each electrode for the electrolysis of aqueous sodium chloride solution using the golden rules
Slide 14 – Special mention for the half equation for the oxidation of hydroxide ions to form oxygen and water, as this one is particularly difficult.
Slide 15 - Exam
Contraception GCSE Science lesson with questions and answers. Includes hormonal and non-hormonal methods of contraception and evaluating the use of contraceptives. Lesson covers all the specification points forAQA Combined Science/Biology 4.5.3.5. The slides are fully animated and include answers to every mini plenary question and exam question.
Waste water treatment potable water diagram with steps. Urban lifestyles and industrial processes produce large amounts of waste water that require treatment before being released into the environment. Sewage and agricultural waste water require removal of organic matter and harmful microbes. Industrial waste water may require removal of organic matter and harmful chemicals Lesson objectives: State sources of waste water, Explain the steps involved in the treatment of sewage, comment on the relative ease of obtaining potable water from waste, ground and salt water. This lesson follows on from the potable water lesson here /teaching-resource/potable-water-lesson-12502600. All the slides in this lesson are fully animated and include answers to every mini plenary question and exam question. The breakdown of the slides is as follows:
Slide 1 - Title and 5-minute starter. The starter is a grid of four questions entitled ‘last week, last lesson, today’s learning and future learning’. Use this generic slide for all of your lessons by simply changing the questions and the answers each time.
Slide 2 - Lesson objectives (see above)
Slide 3 – Intro to urban lifestyles and industrial processes
Slide 4 – Hinge question: Can you name specific examples of sources of waste water?
Slide 5 – Source 1 of waste water – domestic
Slide 6 – Source 2 - agricultural
Slide 7 – Source 3 - industrial
Slide 8 – Mini plenary questions, answers animate on screen
Slide 9 – Steps involved in treating waste water: Step 1 - Screening
Slide 10 – Step 2 - Sedimentation
Slide 11 – Step 3 – Anaerobic digestion
Slide 12 – Step 4 – Aerobic biological treatment
Slide 13 – Solutions given for the products at each electrode for the electrolysis of aqueous sodium chloride solution using the golden rules
Slide 14 – Special mention for the half equation for the oxidation of hydroxide ions to form oxygen and water, as this one is particularly difficult.
Slide 15 – ALT (Applied learning time). 6 mark exam style question, designed to test students’ understanding of the whole lesson. Answers animate onto the screen.
Slide 16 – Plenary. Cold call questions which animate onto the screen with pupils’ names attached as a final check that learning has taken place and that you have done your job!
Follow me on Twitter https://twitter.com/LyricalPedagog
If you have a positive experience with the resource please leave a positive review!
Electrolysis Chemistry lesson including the process of electrolysis and using electrolysis to extract metals. Lesson objectives are: define an electrolyte, explain what happens when an electric current is passed through an electrolyte and explain how electrolysis can be used to extract metals from molten compounds. The slides are fully animated and include answers to every mini plenary question and exam question. The breakdown of the slides is as follows:
Slide 1 - Title and 5-minute starter. The starter is a grid of four questions entitled ‘last week, last lesson, today’s learning and future learning’. Use this generic slide for all of your lessons by simply changing the questions and the answers each time.
Slide 2 - Lesson objectives (see above)
Slide 3 - Introduction to what happens to an ionic compound when it is melted or dissolved in water. Simple, clear, pencil-sketch diagram of beakers containing solid sodium chloride and the stages in becoming sodium ions animates on to screen
Slide 4 - Definition of electrolytes given
Slide 5 - Mini plenary. Three questions of increasing difficulty. Answers animate onto the screen
Slide 6 - Introduction to electrolysis process using example of molten sodium chloride. Simple, clear, sketch diagram of beaker with electrodes, cell, wires and molten sodium chloride. Students are shown on this slide that the electrodes are made of carbon.
Slide 7 - Explanation, with use of a diagram, of the movement of ions that take place when an electric current is passed through the molten sodium chloride, i.e. positive ions move towards the negative electrode, etc.
Slide 8 - Explanation, with use of a diagram, of what happens at each electrode, i.e. positive ions are discharged at the negative electrode, producing the element, etc.
Slide 9 - Mini plenary. Two questions of increasing difficulty. Answers animate onto the screen
Slide 10 - Introduction to reactivity series with useful mnemonic and which metals must be extracted from their ores using electrolysis
Slide 11 - Explanation as to why a lot of energy is needed to perform electrolysis of molten compounds to extract the metal
Slide 12 - Introduction to the example of extracting aluminium from aluminium oxide, including why cryolite is added to the elctrolyte
Slide 13 - Mini plenary. Pupils asked to draw a labelled diagram of the electrolysis of molten aluminium oxide
Slide 14 - Mini plenary review reveals diagram of apparatus and also explains what happens at each electrode, i.e. aluminium ions are discharged at the negative electrode, producing the element aluminium
Slide 15 - Think-pair-share based on the following question: In the electrolysis of aluminium oxide, the positive electrode must be continually replaced. Why do you think this is?
Slide 16 - Explanation, with use of diagram, as to why the positive electrode must be continually replaced.
Slide 17 -
Follow me on Twitter https://twitter.com/MC_Afrique
Development of the model of the atom GCSE Physics lesson including J.J Thomson, Ernest Rutherford, plum pudding model, nuclear model, alpha particle scattering experiment (gold foil experiment), with questions and answers throughout the lesson. The lesson objectives are as follows: Explain why the discovery of the electron led to a new model for the atom and describe this new model, explain why the new evidence from the scattering experiment led to a change in the atomic model and explain the difference between the plum pudding model of the atom and the nuclear model of the atom. The slides are fully animated and include answers to every mini plenary question and exam question. The breakdown of the slides is as follows:
Slide 1 - Title and 5-minute starter. The starter is a grid of four questions entitled ‘last week, last lesson, today’s learning and future learning’. Use this generic slide for all of your lessons by simply changing the questions and the answers each time.
Slide 2 - Lesson objectives (see above)
Slide 3 – Open question: what does an atom look like? John Dalton’s atomic model is mentioned here
Slide 4 – Introduction to J.J. Thomson and new experimental evidence may lead to an existing model being changed or replaced
Slide 5 – Explanation of the plum pudding model
Slide 6 – Mention of Hantaro Nagaoka, a Japanese scientist who disagreed with Thomson’s plum pudding model. Inclusion of Nagaoka provides an opportunity to diversify the curriculum.
Slide 7 - Mini plenary. Three questions of increasing difficulty. Answers animate onto the screen
Slide 8 – Information about Ernest Rutherford and description of gold foil experiment
Slide 9 – Explanation of Rutherford’s results
Slide 10 - Mini plenary. 4-mark exam question with answer that animates on to the screen.
Slide 11 – Small additions to the nuclear model, e.g. Niels Bohr, James Chadwick and discovery of the proton.
Slide 12 - Applied learning time (ALT). 6-mark exam question with answer.
Slide 13 - Plenary. Quick fire questions with names of random students in the class. Alternatively, you can use the No hands app random name generator
If you have a positive experience with the resource please leave a positive review!
Elastic potential energy lesson with questions and answers. Lesson objectives are: State what the limit of proportionality is, describe what elastic potential energy is and explain what extension is and apply the equation for elastic potential energy. The slides are fully animated and include answers to every mini plenary question and exam question. The breakdown of the slides is as follows:
Slide 1 - Title and 5-minute starter. The starter is a grid of four questions entitled ‘last week, last lesson, today’s learning and future learning’. Use this generic slide for all of your lessons by simply changing the questions and the answers each time.
Slide 2 - Lesson objectives (see above)
Slide 3 - Introduction to elasticity and its meaning
Slide 4 - Definition of limit of proportionality
Slide 5 - Mini plenary. Random name animation used to test pupils’ recall of limit of proportionality definition
Slide 6 - Definition of elastic potential energy
Slide 7 - Mini plenary. Pupils are asked to describe scientifically what an image is showing (a sling shot being pulled back and launching a stone). Answer animates onto screen - elastic potential energy being transferred to kinetic energy
Slide 8 - Introduction to elastic potential energy equation with units
Slide 9 - Explanation of what extension is and how to calculate it (some questions do not state the extension in an obvious way)
Slide 10 - Elastic potential energy worked example 1 (answer animates onto screen in stages)
Slide 11 - Elastic potential energy worked example 2 (answer animates onto screen in stages)
Slide 12 - ALT (Applied learning time). Differentiated elastic potential energy calculation questions (9 in total). Gold, silver and bronze levels of difficulty (Silver and gold require pupils to rearrange the equation)
Slide 13 - ALT review - all answers animate onto screen
Slide 14 - Plenary. Elastic potential energy GCSE exam calculation. Answer animates onto the screen in stages
Follow me on Twitter https://twitter.com/MC_Afrique
If you have a positive experience with the resource please leave a positive review!
Biodiversity definition and waste management GCSE Biology with questions and answers. Includes how waste has an impact on biodiversity. AQA combined science 4.7.3.1 and 4.7.3.2 slides are animated and include answers to all the questions. The lesson ends with GCSE exam questions with answers that animate on the screen
GCSE Combined Science lesson for the AQA specification with** V=IR questions and answers/Ohm’s law questions and answers**. Includes potential difference, current and resistance definitions, mini plenary questions with answers, and ALT (Applied Learning Task) at the end. The PowerPoint is fully animated and includes GIF animations for easier explanations. The AQA specification point that this lesson covers is 6.2.1.3
Follow me on Twitter https://twitter.com/MC_Afrique